
What is AI360 & how to begin?
AI360 is a smart CRM for the hotel & hospitality industry. You create an AI chatbot, “teach” it with your room rates, services and policies, then embed it on your website and messaging channels. The chatbot consults 24/7, closes room bookings, captures leads and re-engages guests, instead of you manning the front desk.
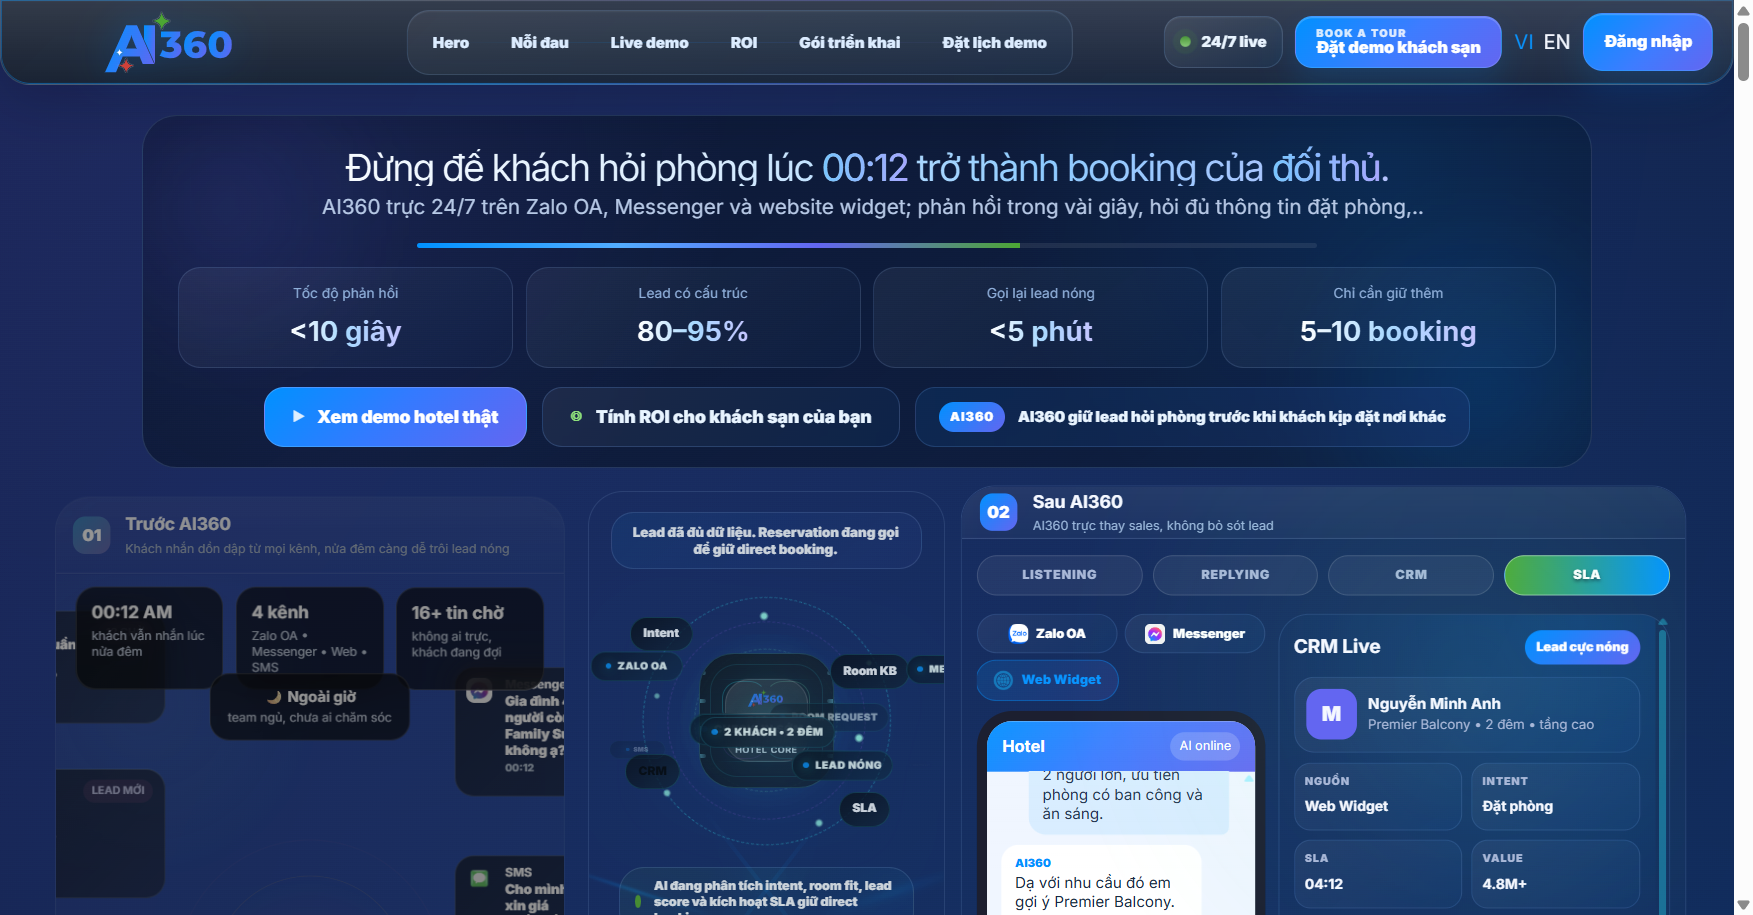
AI360 homepage, where you start your free trial.
🎯 Who it is for
Owners & managers of hotels, resorts, homestays and retreats: every missed room enquiry is a lost room-night.
⭐ Strengths
Instant 24/7 consulting, never miss after-hours inbox, auto-collect customer data in one place, and learns from your own data.
💡 Why you need it
Guests booking rooms often message after hours and compare many places; slow replies lose them to OTAs. AI360 answers instantly and guides them to book direct.
🧭 Roadmap
Sign up → create chatbot → train with files → tune the widget → embed on web / connect channels → track conversations & leads.
Create account, sign in & profile
The first step is to have an AI360 account. You can register with email or sign in quickly with Google.
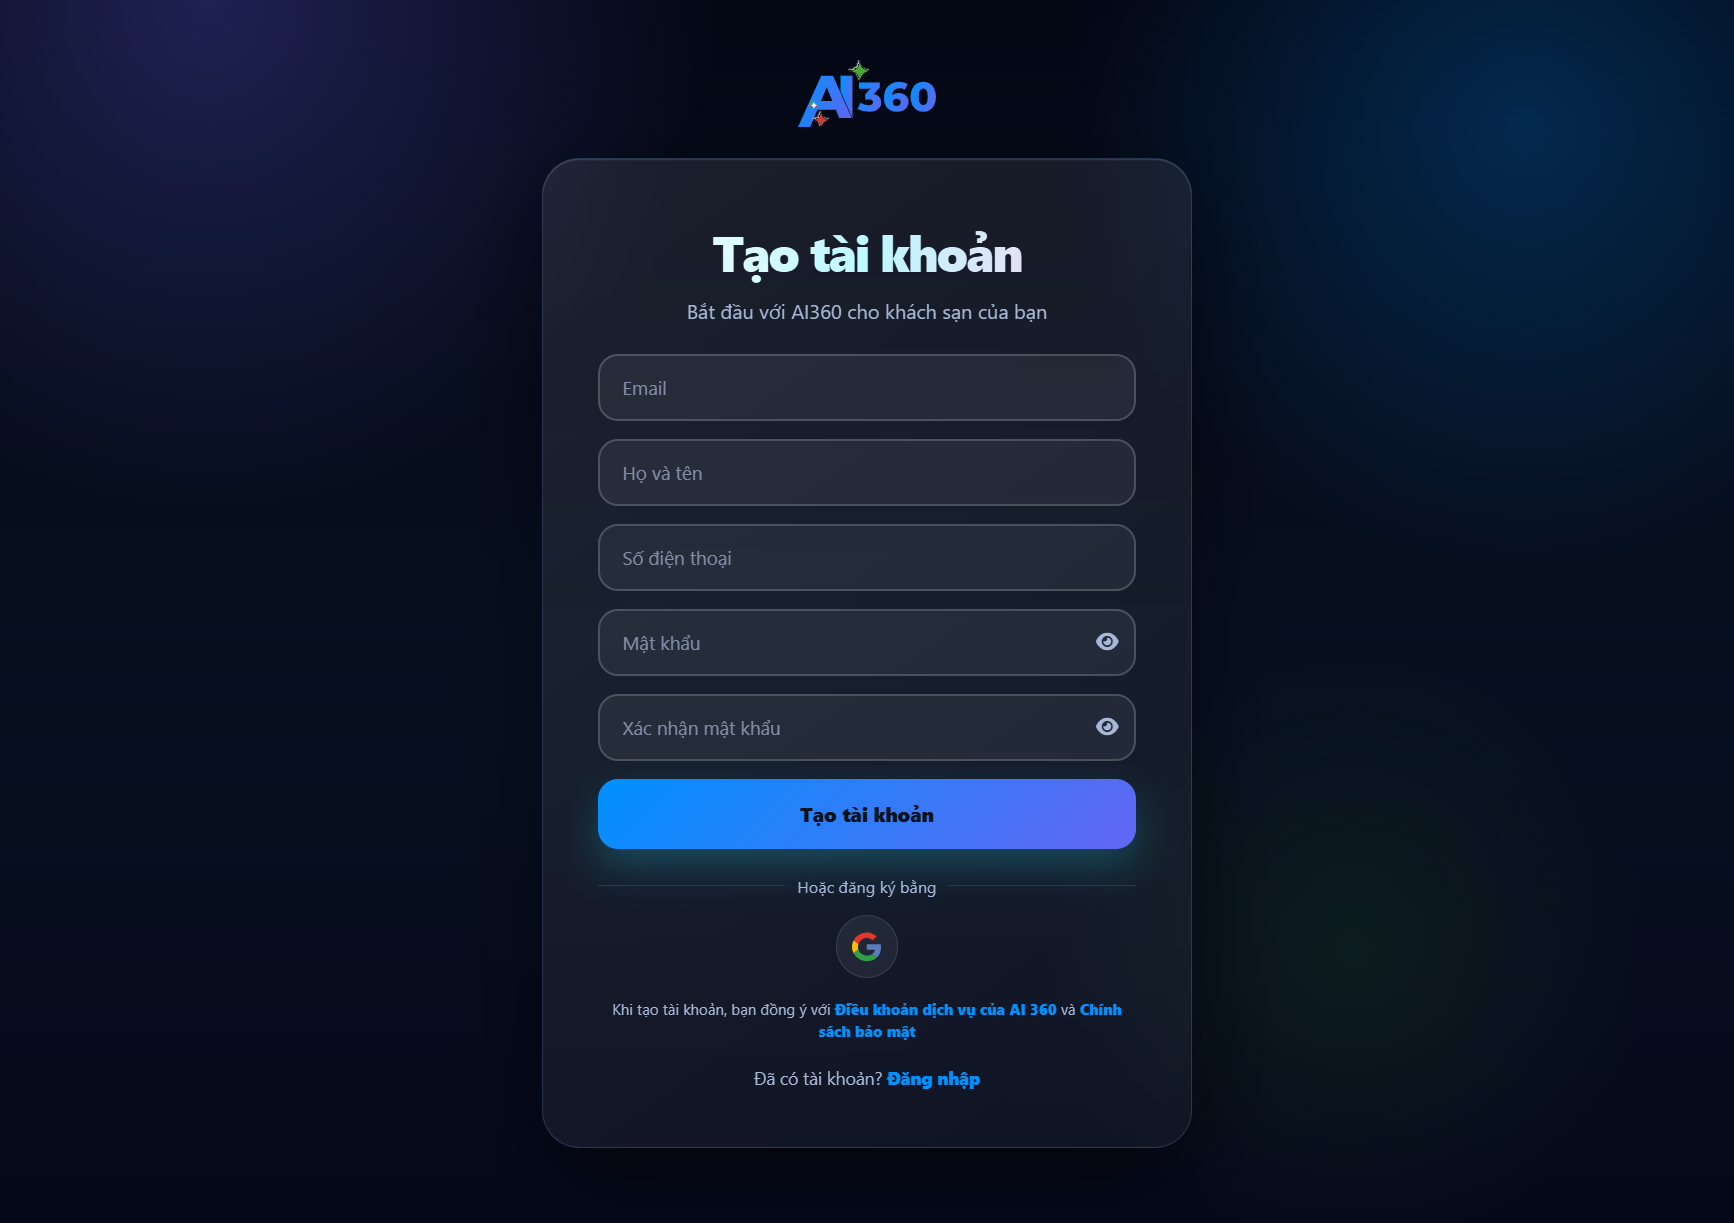
Register an account
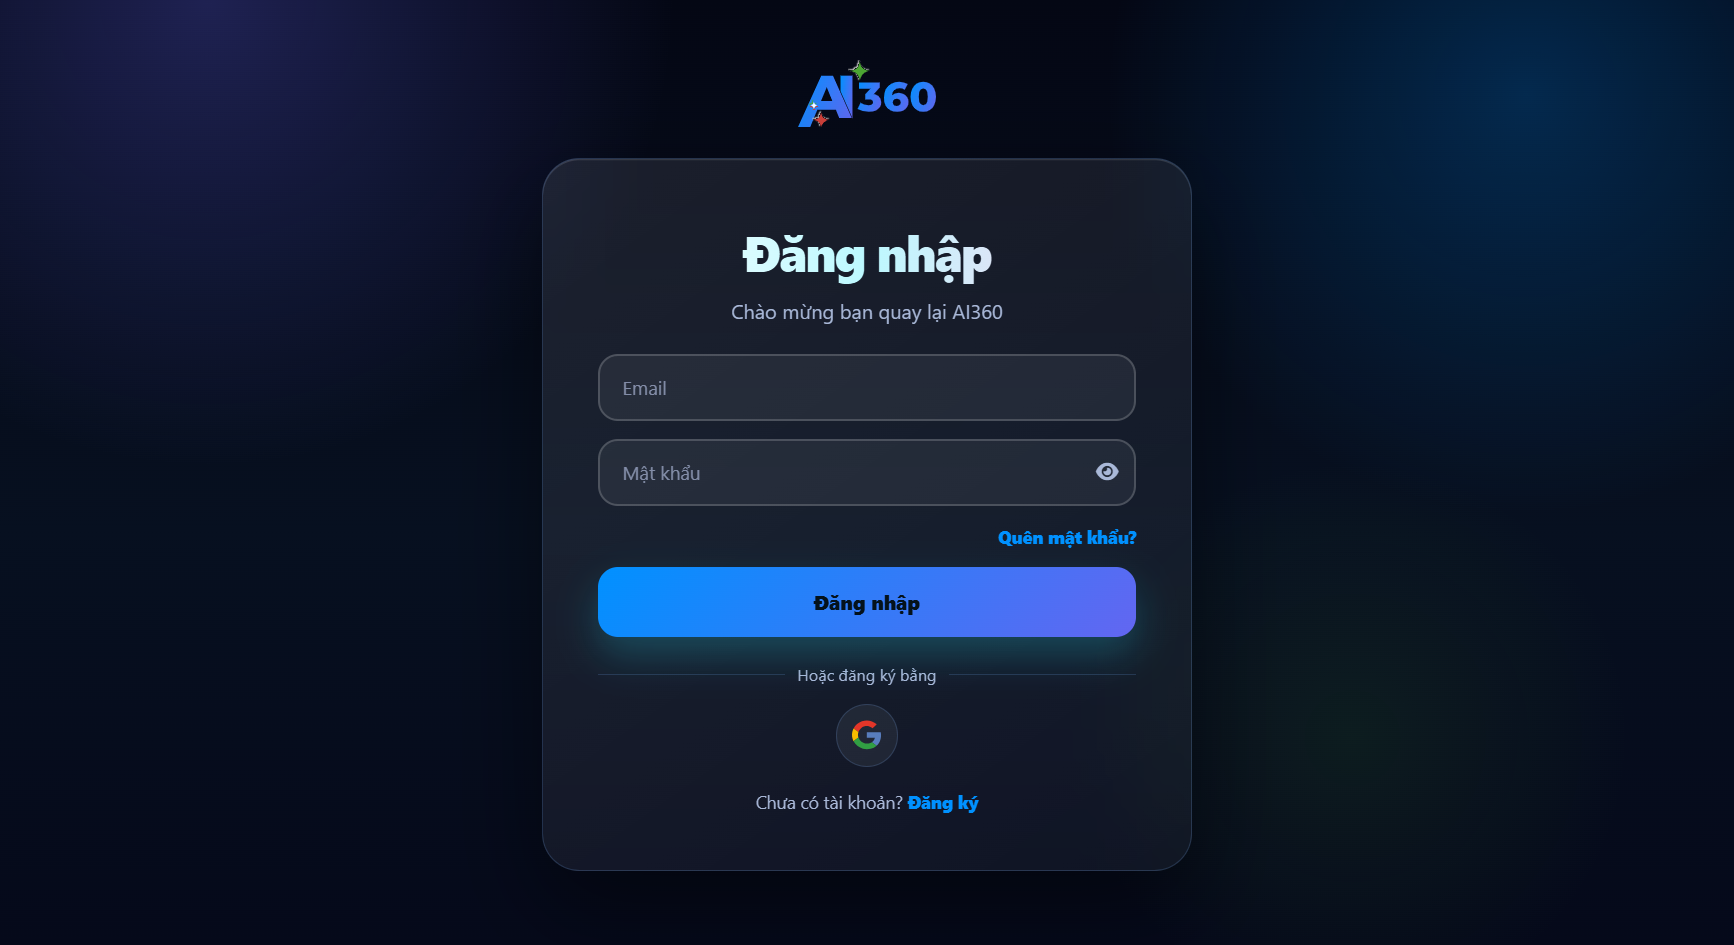
Sign in
Registration steps
- Open the Register page, enter Email, Full name, Phone number, Password and Confirm password. Or click the Google icon to register quickly.
- Check your inbox and click the email verification link to activate your account.
- Sign in. If you forgot your password, use the “Forgot password?” link to reset it via email.
- Go to Account information to update your avatar, name and phone number. To change your password, open Settings at the bottom of the left menu.
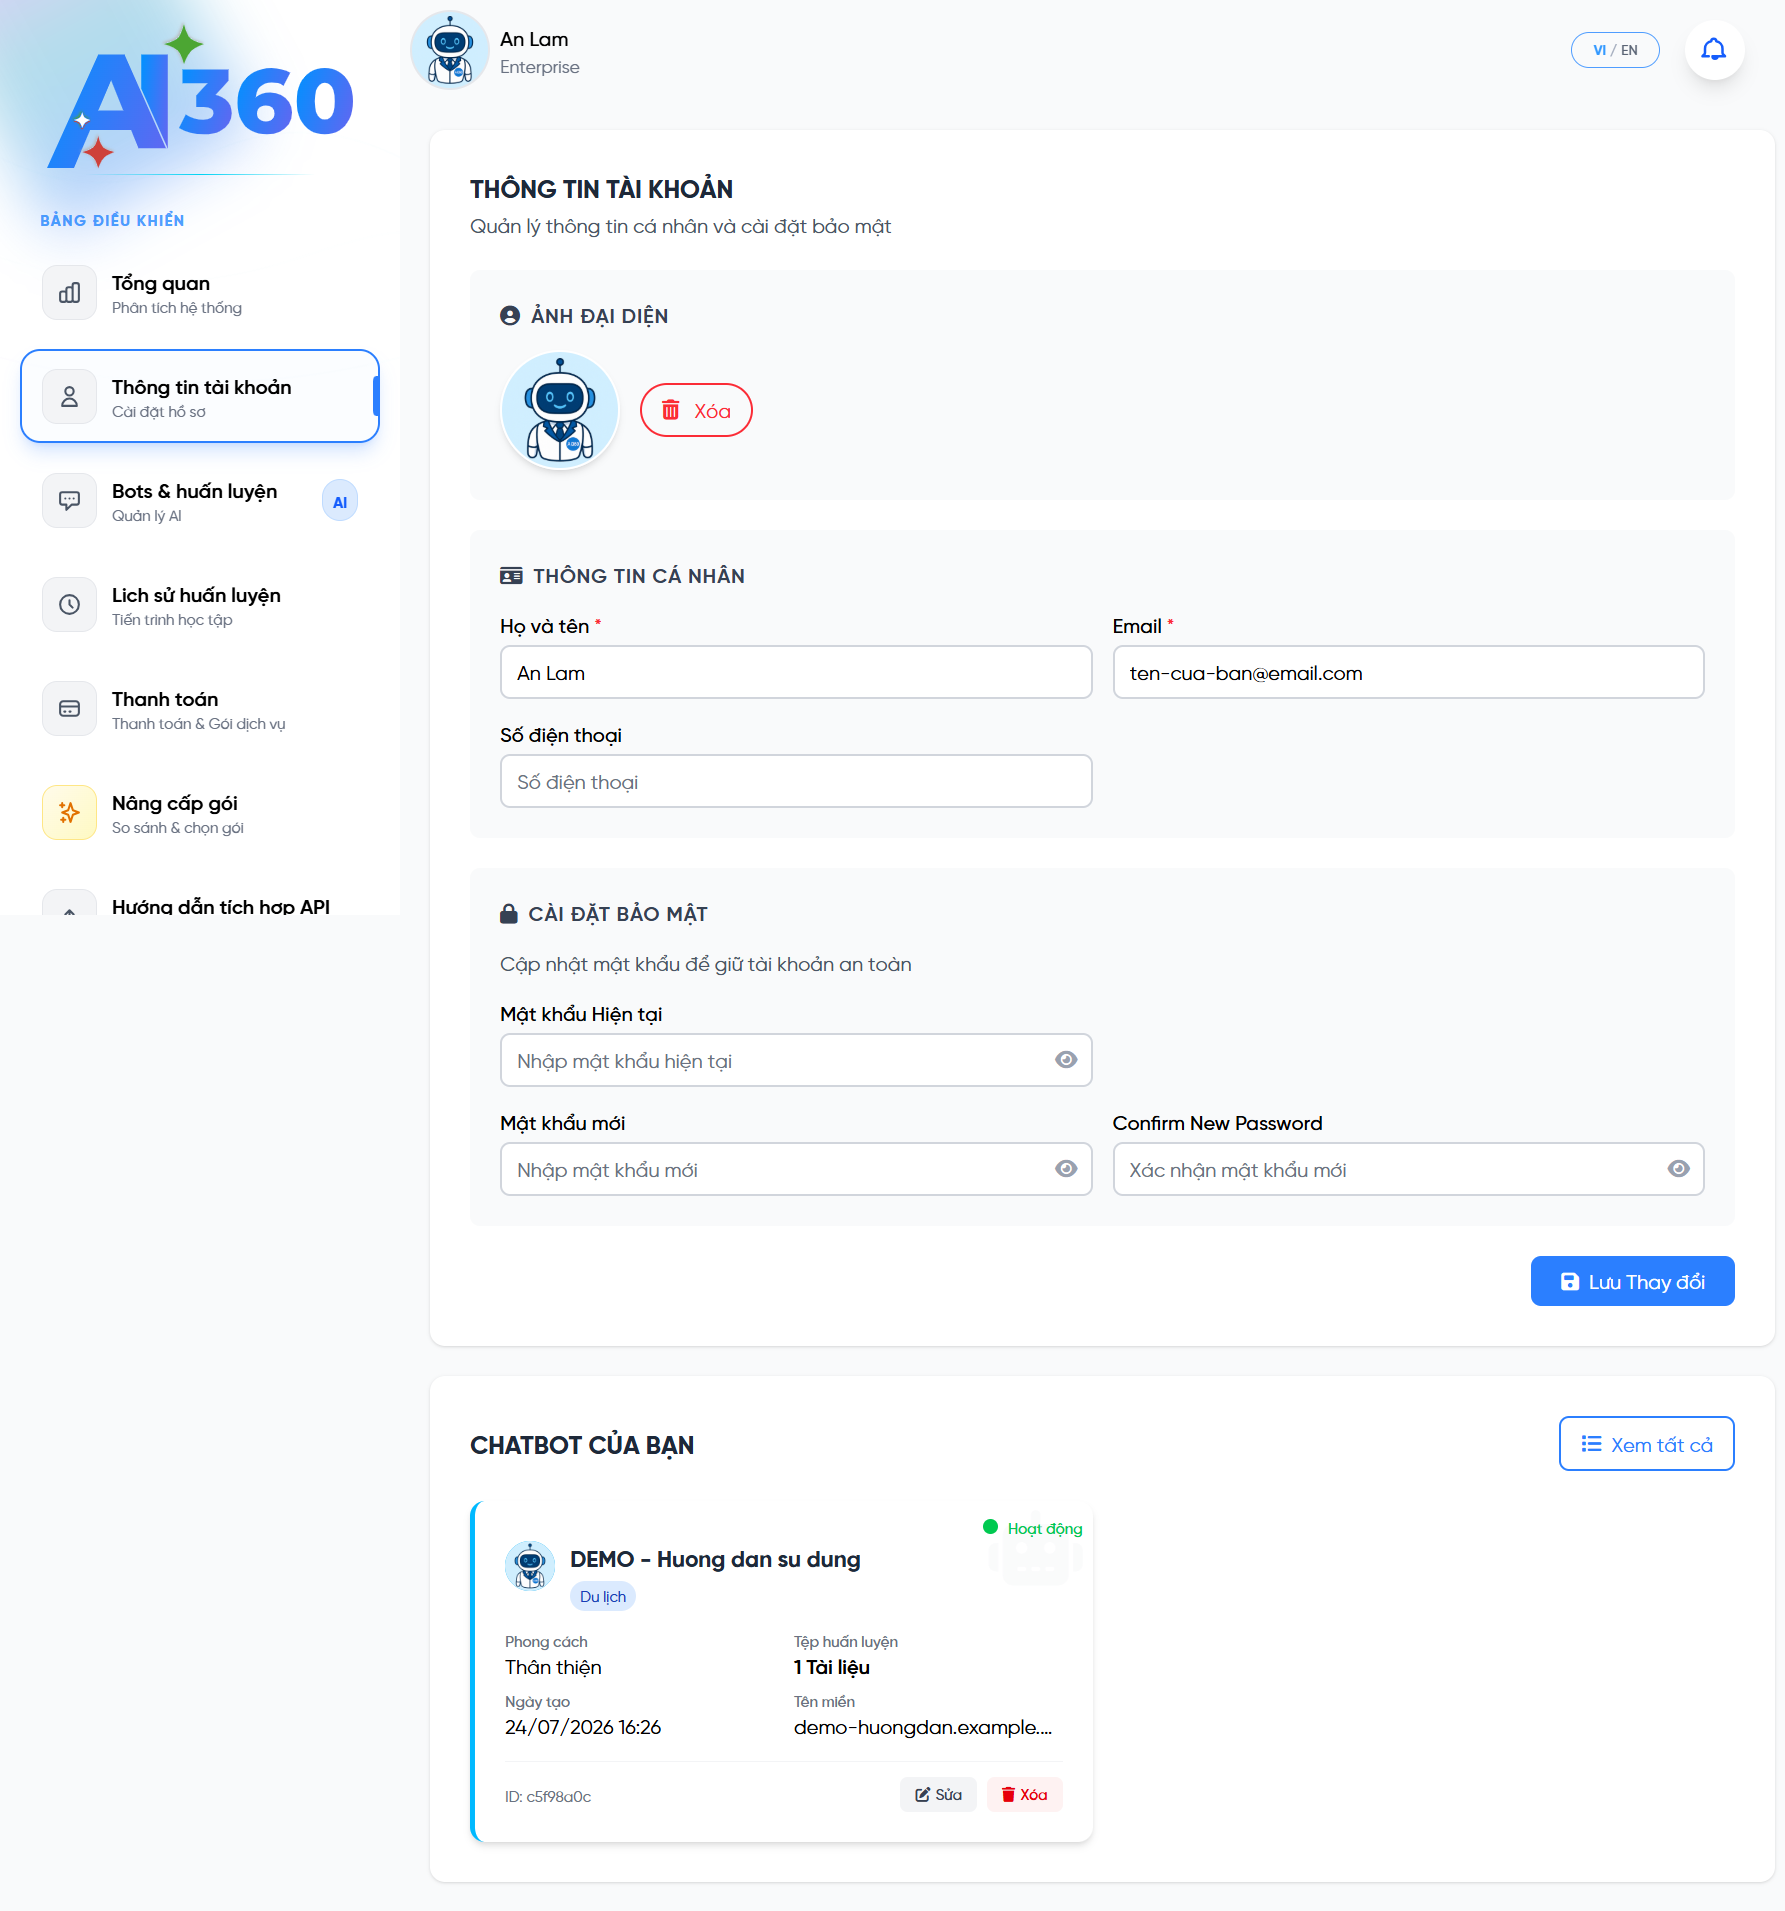
Account information, your avatar, name and phone number. The password lives in Settings.
Overview, read your system metrics
Right after signing in, the Overview screen gives you a quick picture: how many chatbots, how training went, how many conversations & messages, and where customers come from.
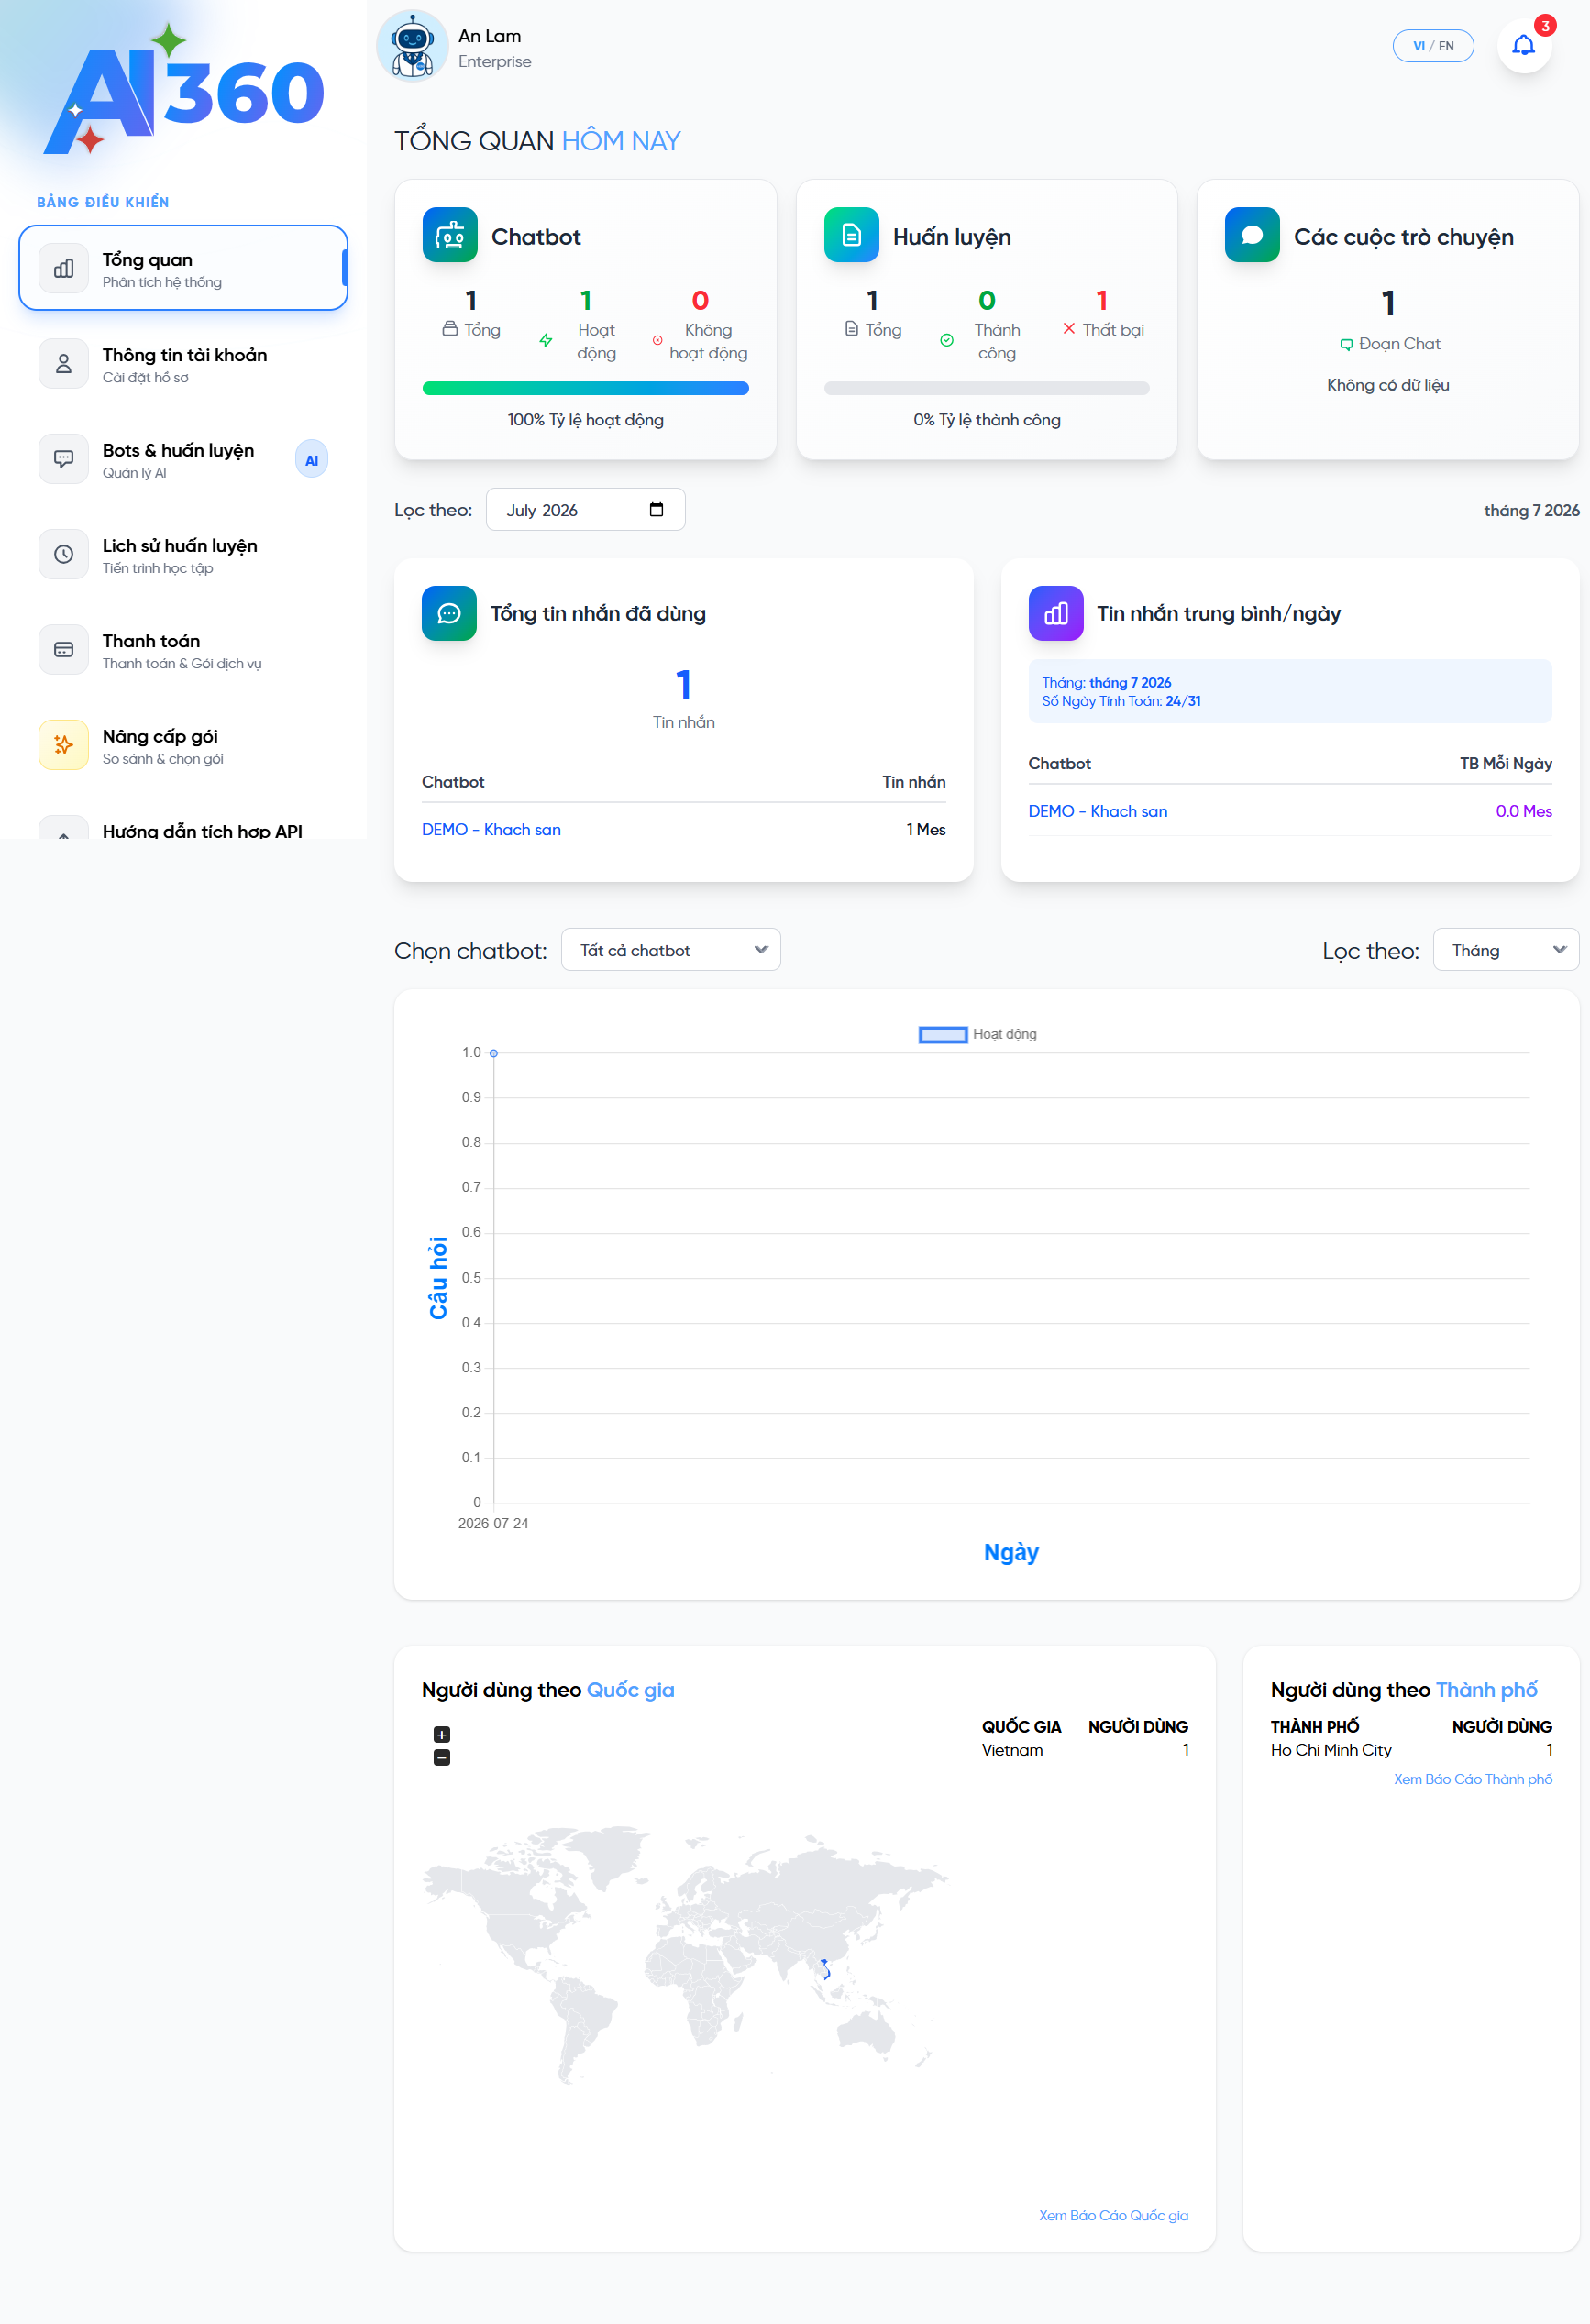
Today's overview dashboard.
Meaning of each metric block
| Block | Meaning |
|---|---|
| Chatbot | Total bots, number Active / Inactive and the active rate. |
| Training | Number of trained files, Success / Failed, see whether data is loaded into the bot. |
| Conversations | Number of chat threads customers had with the bot. |
| Total messages used | Messages consumed this month (against your plan quota). |
| Average messages/day | Average daily busyness during the selected month. |
| Users by Country / City | Where messaging customers come from, useful to know your market and peak hours. |
| Month filter | Pick a month/year to view metrics for that period. |
Create a Chatbot & basic configuration
Go to Bots & training → “+ Create New Chatbot”. This is the most important screen, where you shape the bot's personality, tone and appearance. Below is the meaning of each option.
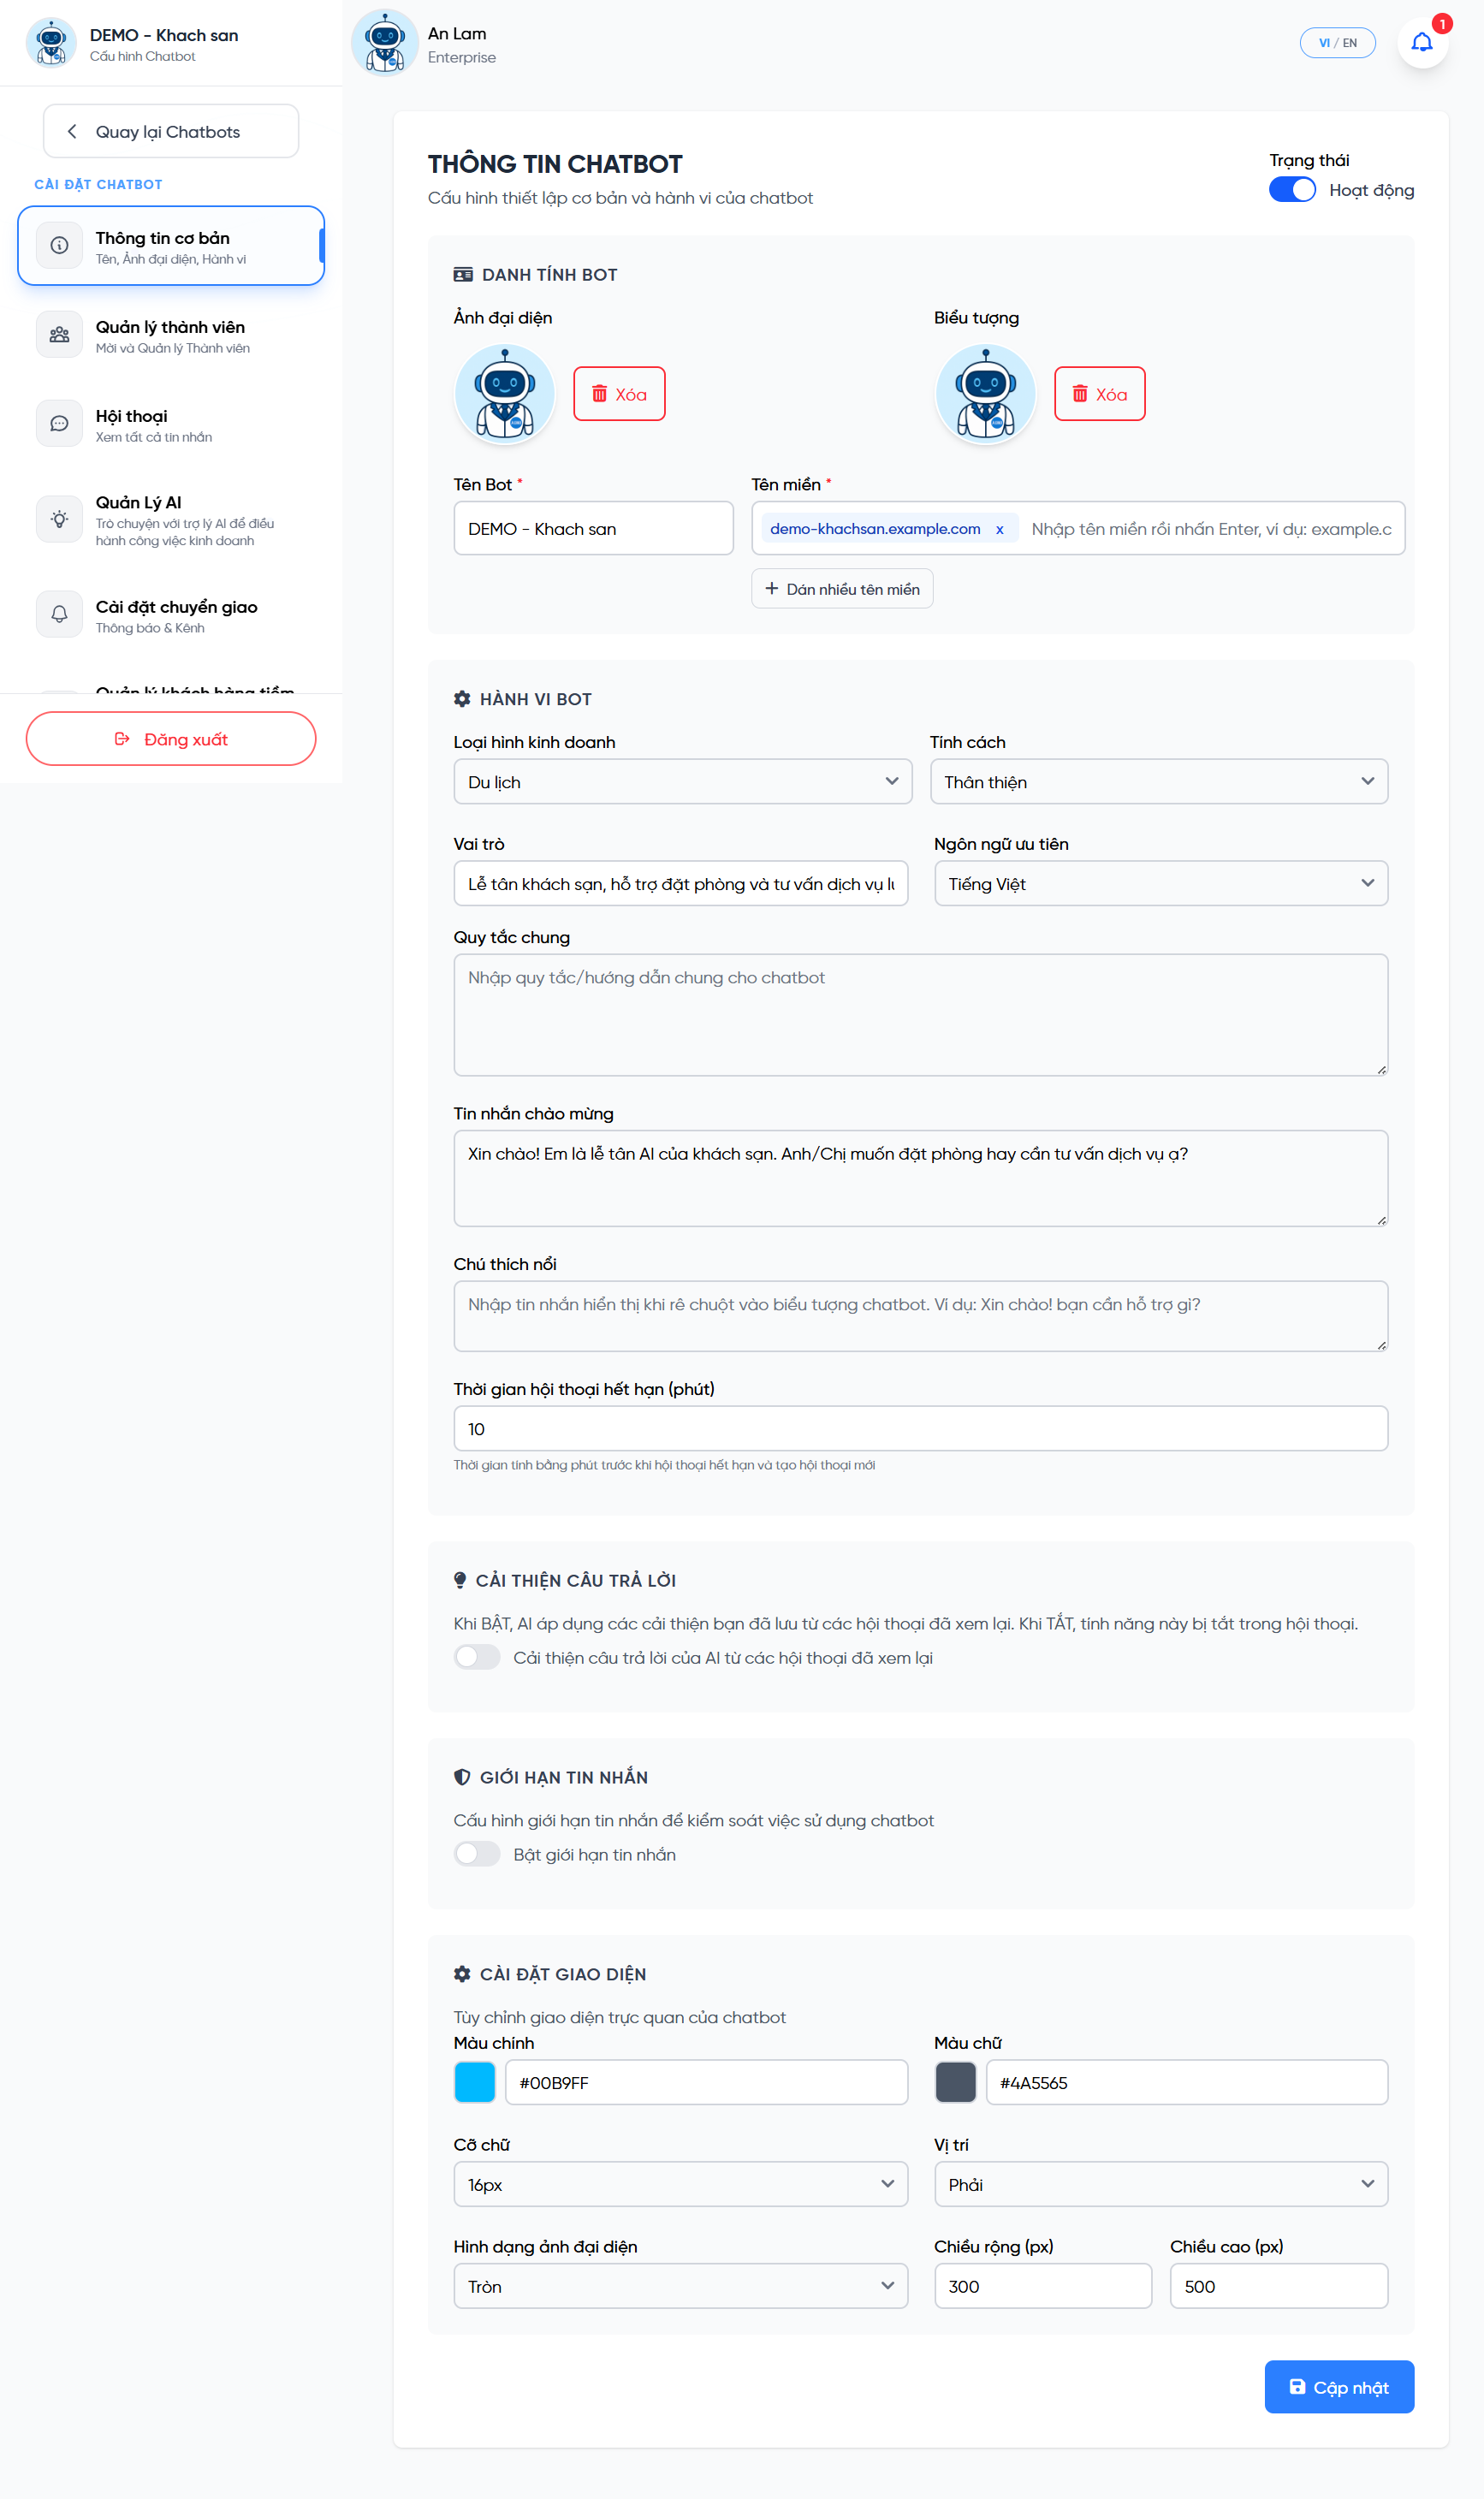
The chatbot basic configuration page.
Bot identity
| Field | Meaning & tips |
|---|---|
| Status | Active: the bot answers customers. Off: pause the bot (while editing, before going live). |
| Avatar | Shown in the chat window. Use a logo or a friendly consultant photo. |
| Icon | The floating chat button in the website corner (when minimized). Keep it clear and eye-catching. |
| Bot Name required | The name shown to customers, e.g. “ABC Hotel Receptionist”. |
| Domain required | The websites allowed to embed the bot. Type a domain then press Enter; you can add multiple domains or paste in bulk. |
Bot behavior
| Field | Meaning & options |
|---|---|
| Business type | Orients the industry so the bot answers in context. Options: Travel, IT, Health, Finance, Education, Entertainment, Food & Nutrition, E-commerce, HR & Recruitment, Real estate, Automotive, Legal services, Public services, Logistics & Delivery, Custom. (Hotels/hospitality should pick Travel.) |
| Personality | The bot's tone: Friendly · Professional · Humorous · Serious · Custom. |
| Role | What role the bot plays, e.g. “Hotel receptionist helping with room bookings & stay services”. |
| Preferred language | Vietnamese or English, the default reply language. |
| General rules | General guidance/constraints (e.g. “always ask needs before quoting”, “never promise a 100% cure”). |
| Welcome message | The first line the bot sends when a customer opens the chat. |
| Hover note | The line shown when hovering over the chat icon, used to invite customers to click. |
| Conversation timeout | Minutes of inactivity before a new conversation is created (1-1440 min, default 10). |
| Improve answers | Turn on so the bot applies improvements you saved while reviewing conversations (see Chapter 9). |
| Message limit | Turn on to cap the number of messages to control usage cost. |
Visitor information before chat
Turn this on and the website widget shows a short form asking for the visitor's name and/or phone number before the chat starts. The name then replaces guest_... in Conversations, and the AI addresses the customer by name for the rest of the chat.
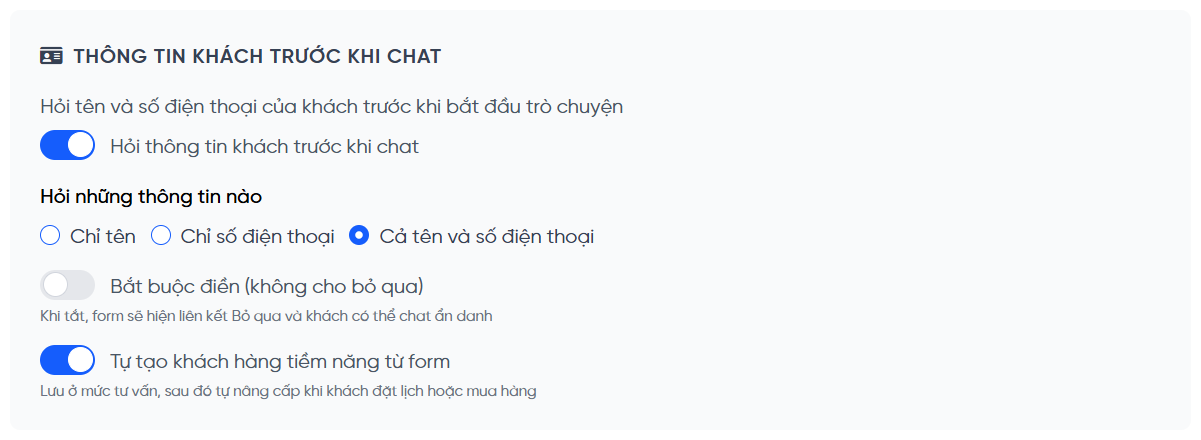
The settings block in the Settings section, turn it on to reveal the options below.
| Field | Meaning & options |
|---|---|
| Ask for visitor information before chat | The master switch. Off by default, so nothing changes for your visitors until you turn it on. |
| Which fields to ask | Name only · Phone only · Name and phone. The fewer you ask for, the more visitors finish the form. |
| Required (visitor cannot skip) | On: the visitor must fill the form before they can type. Off: a Skip link appears and they may chat anonymously. |
| Create a potential customer record from the form | Saves each submission as a lead at consultation level. If that customer later books or orders, the same lead is upgraded instead of a duplicate being created (see Chapter 12). |
Widget appearance settings
| Field | Meaning |
|---|---|
| Primary color | The main color of the chat window (match your brand). Default #00B9FF. |
| Text color | Text color in the chat window. |
| Font size | From 11px to 26px (default 16px). |
| Position | The corner for the chat button: Right or Left. |
| Avatar shape | Circle · Square · Rounded. |
| Width / Height | The chat window size (px) on the website. |
⭐ Strengths
A single form shapes both personality and appearance, no technical skills needed.
💡 Why you need it
Getting “personality + rules” right makes the bot answer true to your brand, avoiding rambling or off-tone replies.
Steps
- Set the Bot Name and enter the website Domain (press Enter).
- Choose Business type, Personality, enter Role and Welcome message.
- Fine-tune the appearance (color, font size, position) to match your brand.
- Click Create Bot. After saving, advanced sections (channels, conversations, scenarios...) unlock.
Training & Data (Knowledge Base)
This is where you “teach” the bot with your documents. The bot answers based on the data you upload, the more complete, the more accurate.
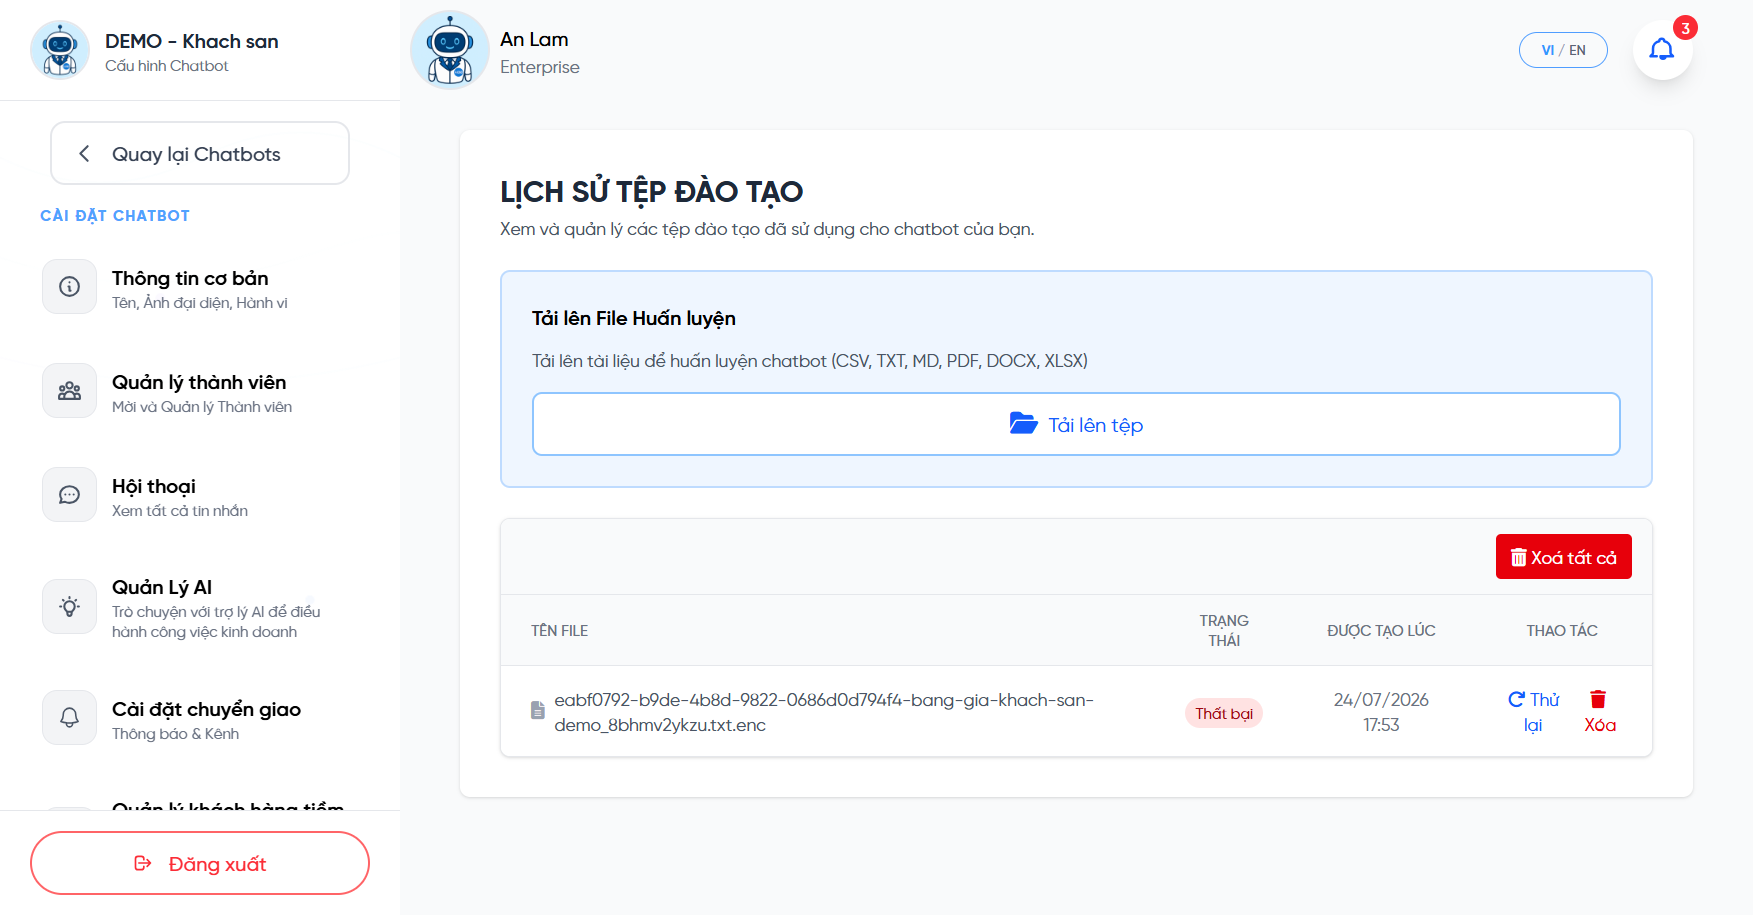
Training file history after uploading.
📄 What to upload
Price list, service catalog, FAQs, policies, opening hours, promotions... Supported formats: CSV, TXT, MD, PDF, DOCX, XLSX.
⭐ Strengths
Files are encrypted at rest (.enc); the bot answers from your own data, not generic talk.
💡 Why you need it
Without data, the bot only answers generally. With a price list & services, it can quote and book accurately.
🔄 Status
Each file goes: Processing → Success (or Failed to re-upload). See it under Training history.
Steps
- Open the chatbot's Training & Data section.
- Click Upload file, choose a file (price list, services...).
- Click Upload file again to start processing; wait for the status to turn Success.
- You can Delete a single file or Delete all when updating data.
Test it & grab the website embed code
Before giving it to customers, chat-test the bot to check its answers. Once happy, grab the embed code and paste it on your website.
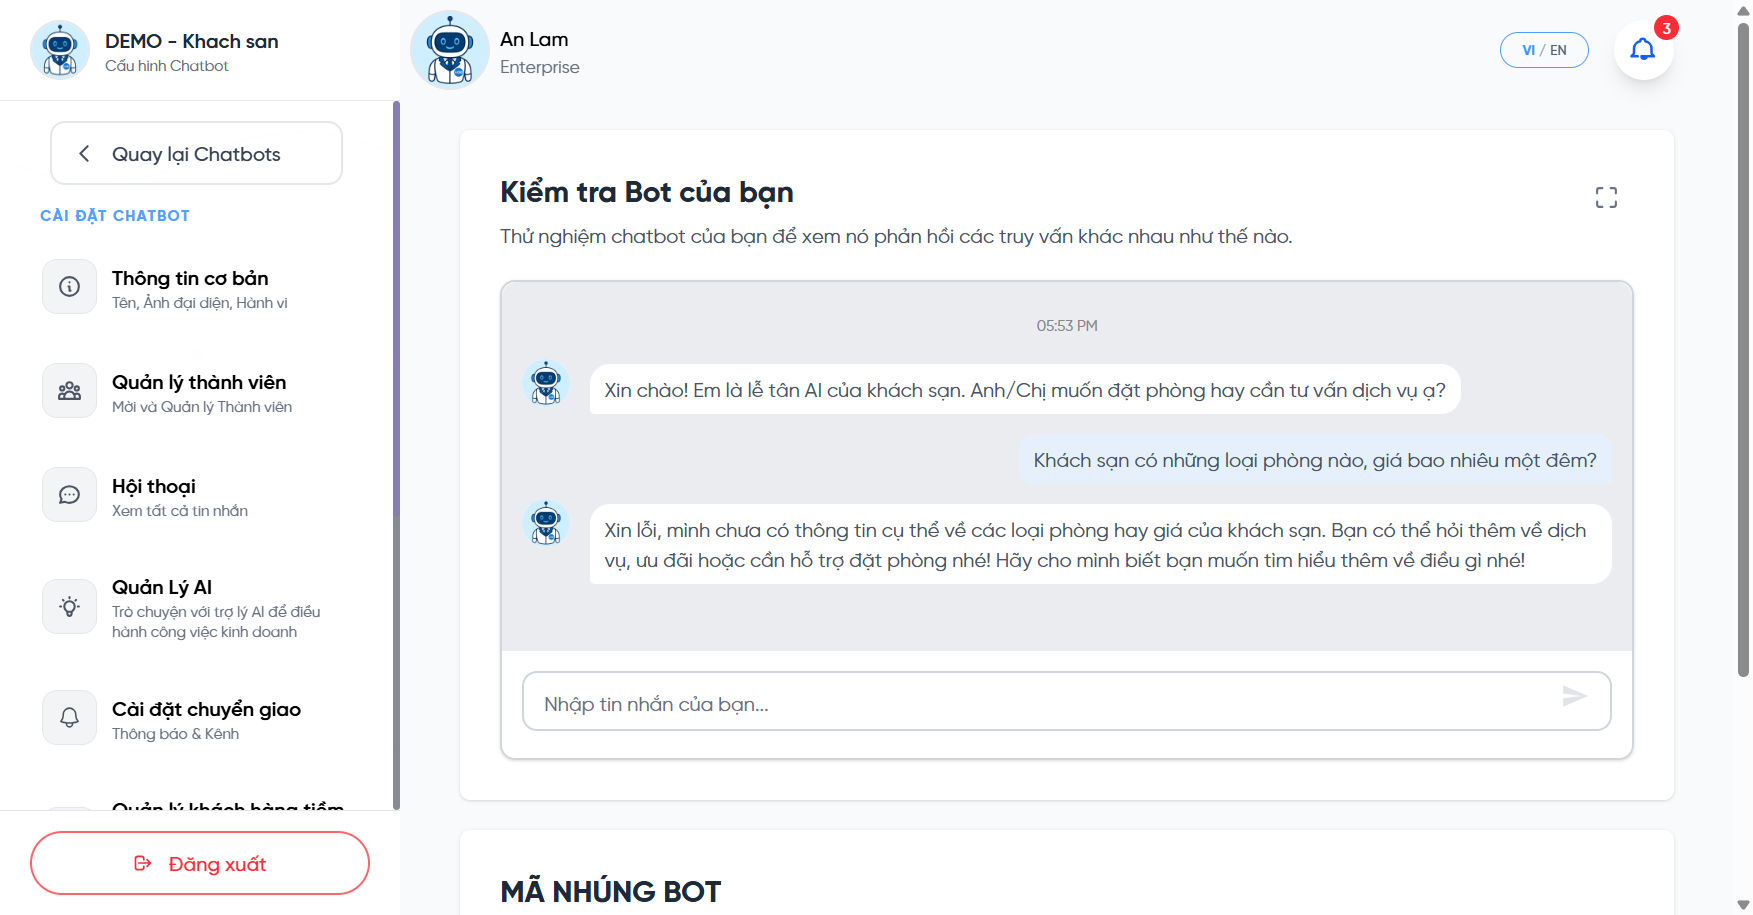
The “Test Bot” box, chat-test right on the page.
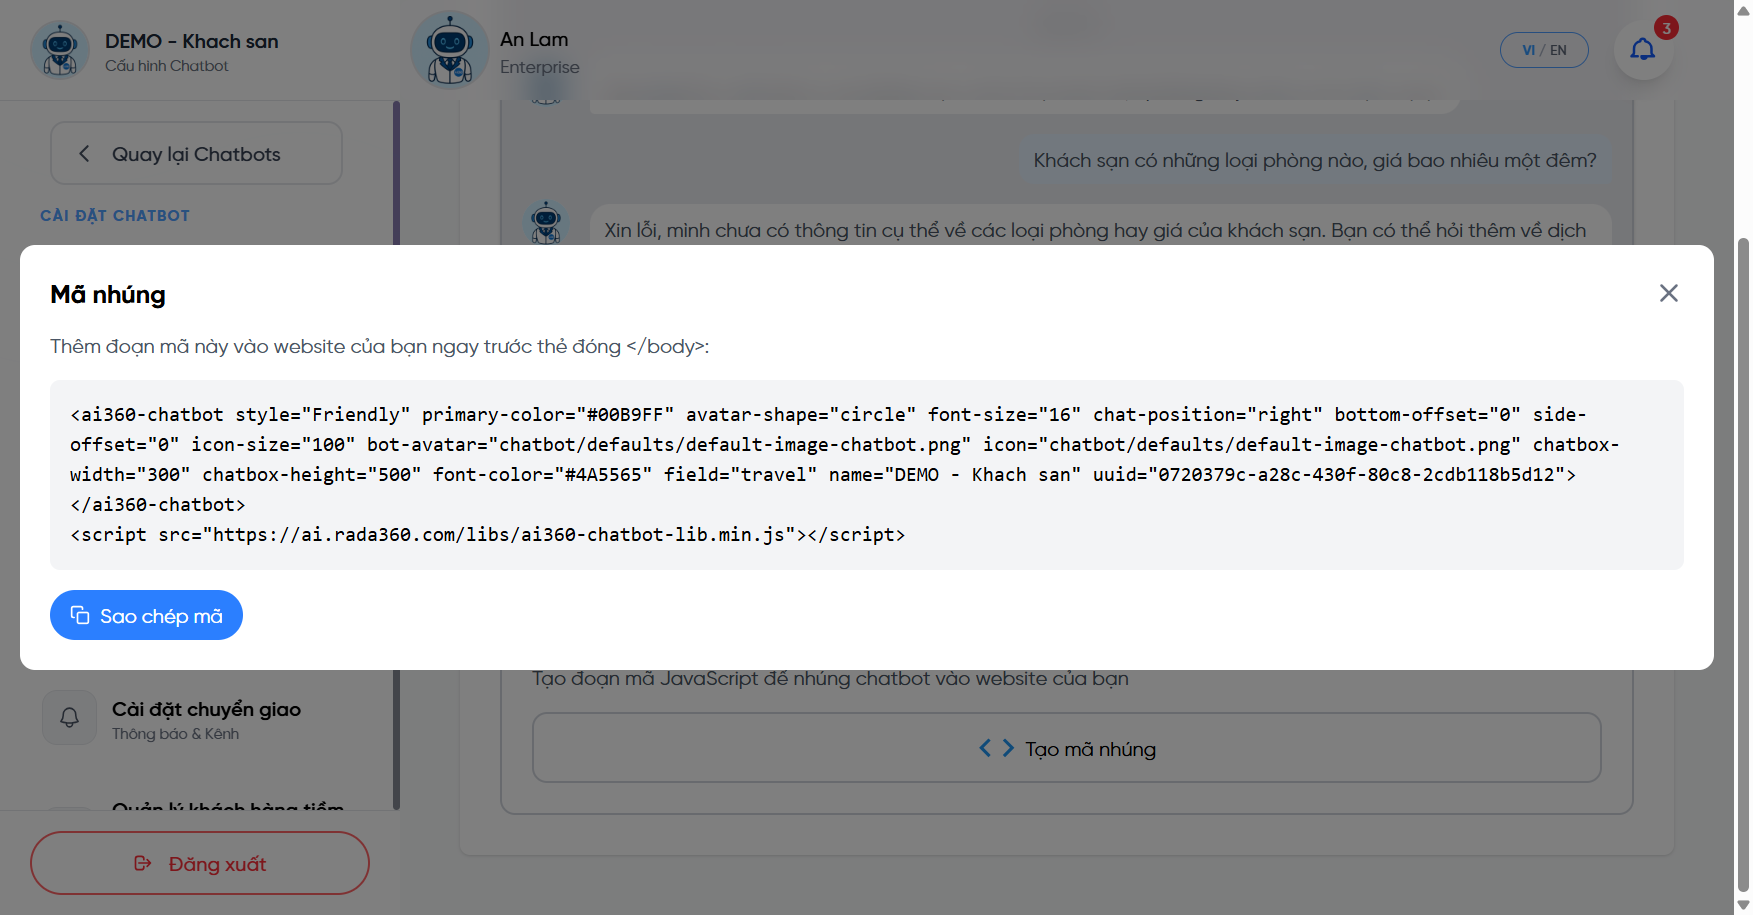
The <ai360-chatbot> embed code to paste into your website.
⭐ Strengths
Preview exactly what customers see; the embed code already bundles color, size, domain, just copy & paste.
💡 Why you need it
Chat-testing finds wrong/missing answers so you can add data before real customers meet the bot.
Embedding steps
- Go to Test & Embed Code, type a few questions to check the bot.
- Click Generate embed code, then Copy code.
- Paste the snippet into your website, right before the closing
</body>tag. - Reload the website, the AI360 chat button appears in the corner.
Connect messaging channels
Not just the website, the bot can answer customers right on the channels they use: Zalo OA, Facebook Messenger, Telegram, Viber, TikTok.
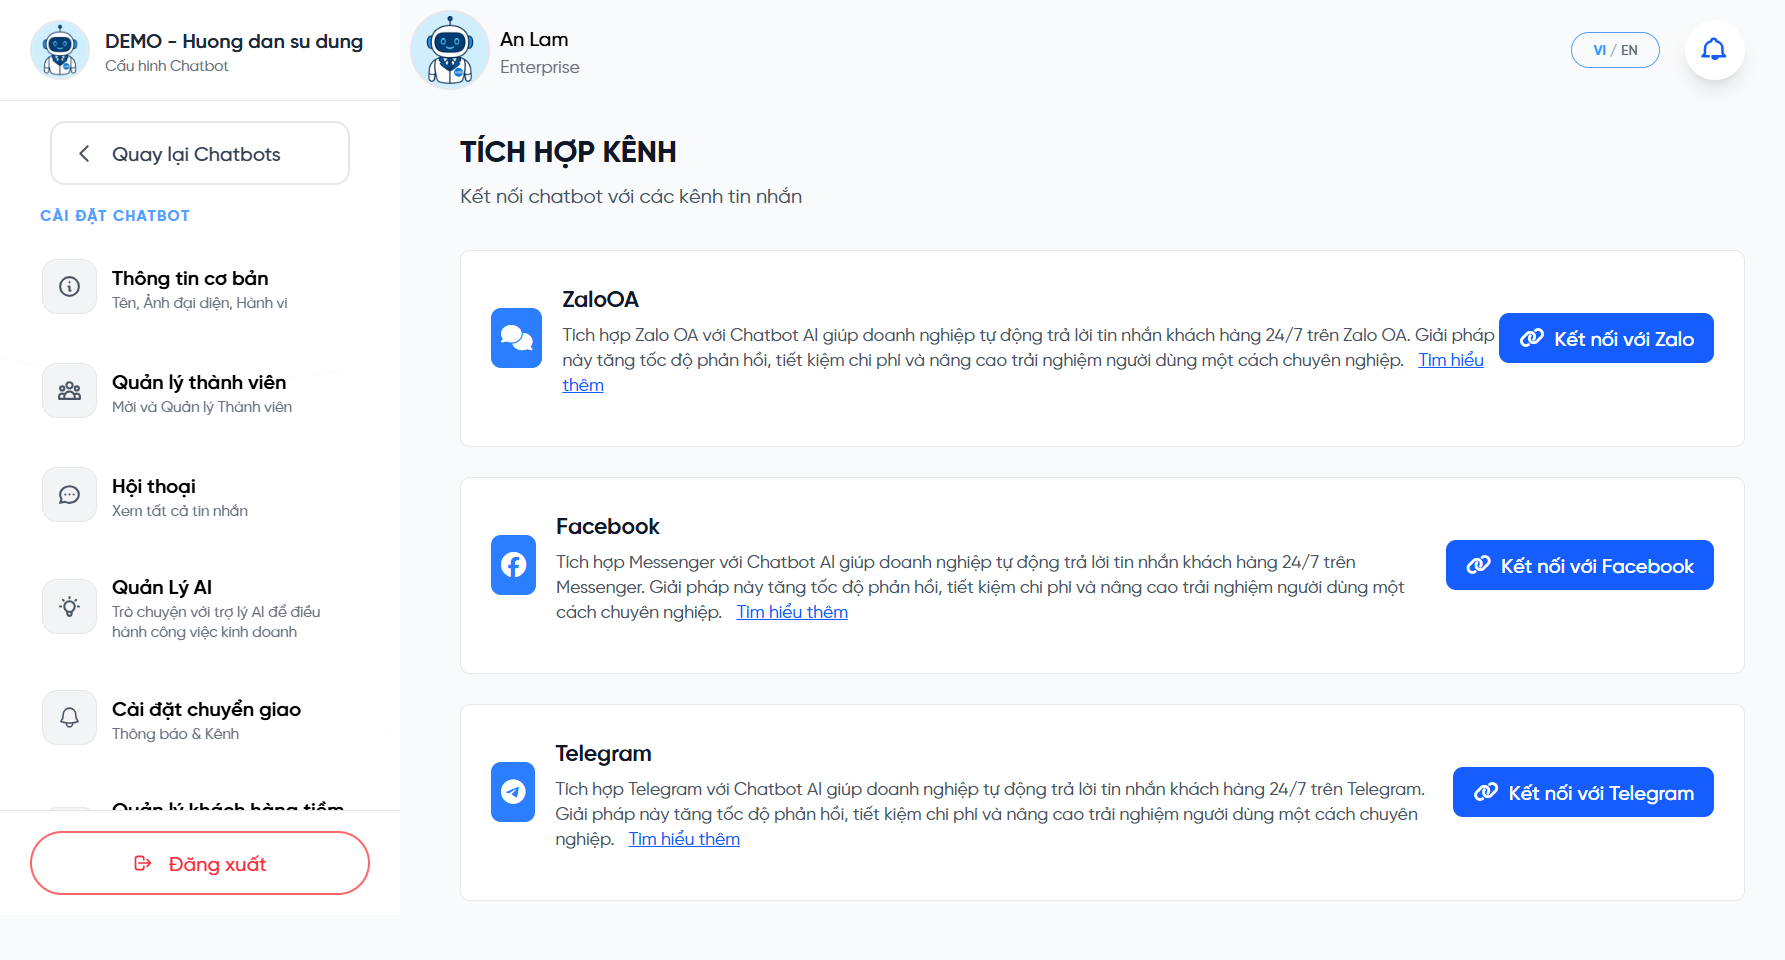
The “Channel integration” screen with a connect button per platform.
⭐ Strengths
One bot, many channels. Wherever customers message, they get instant replies from the same trained “brain”.
💡 Why you need it
Guests booking rooms mostly come from Zalo, Facebook & OTA channels. Connecting channels avoids missing after-hours room enquiries.
Manage conversations
All messages between customers and the bot (every channel) are stored under Conversations. You can monitor, search, filter and step in to reply manually when needed.
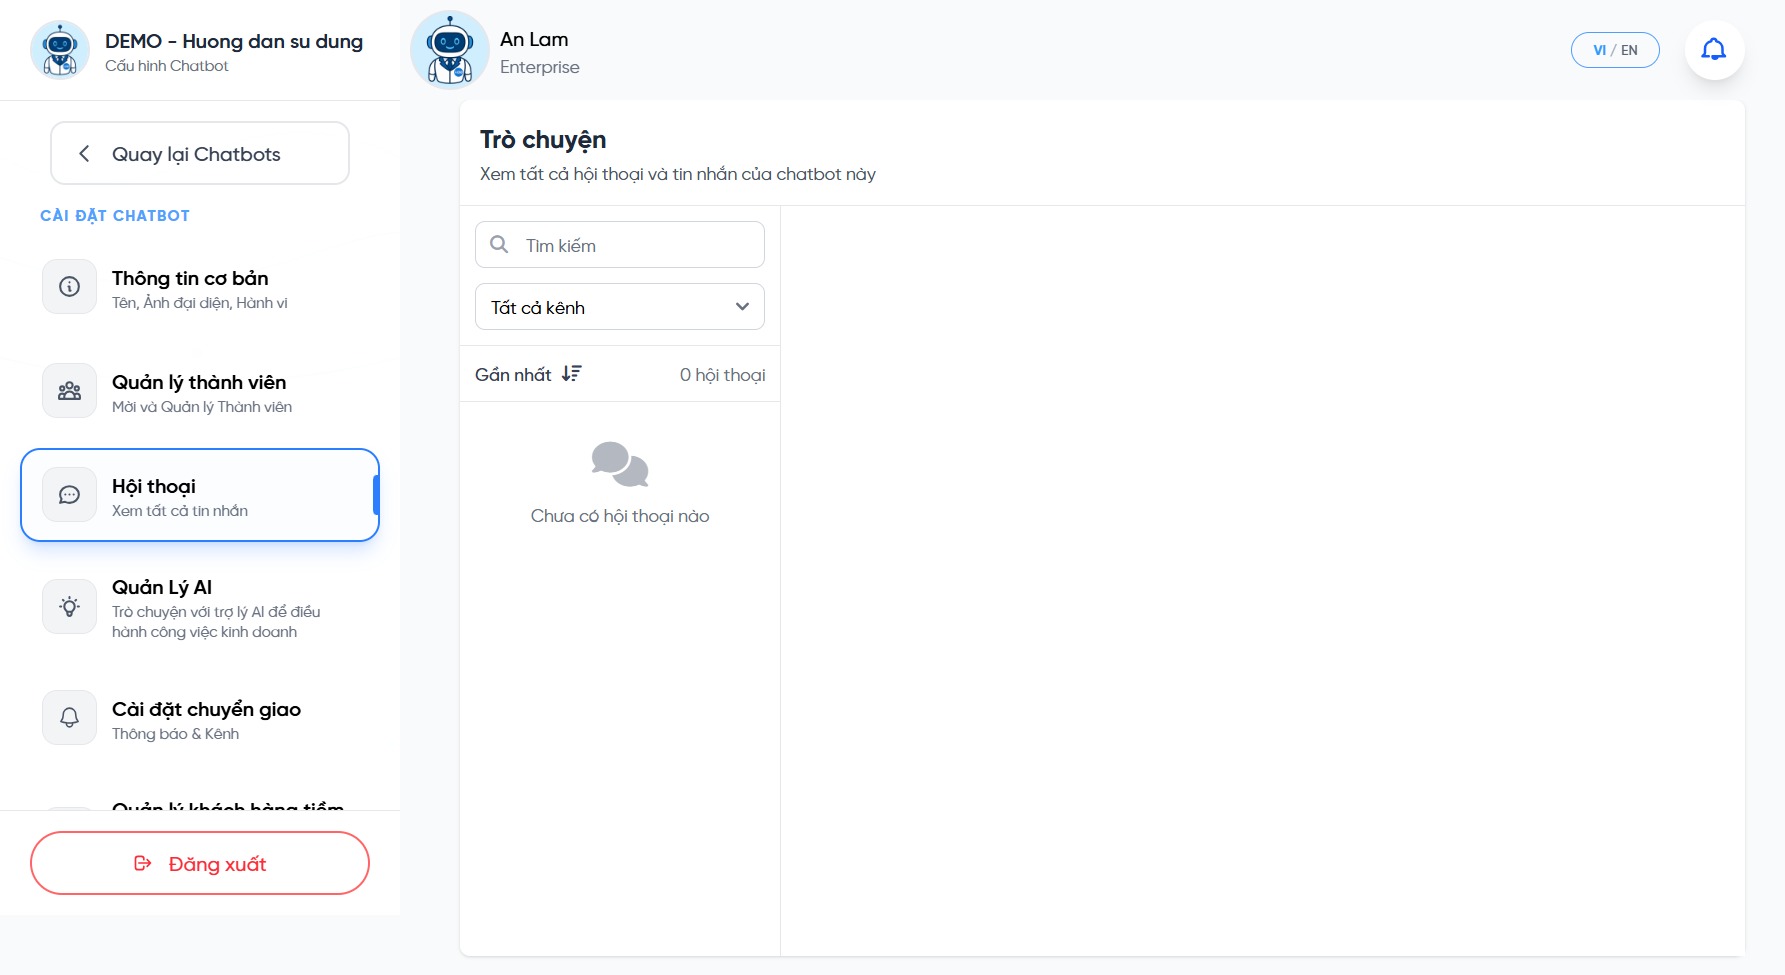
Conversation list with search and channel filter.
What you can do here
| Feature | Meaning |
|---|---|
| Search | Quickly find conversations by content/customer. |
| Filter by channel | Filter: All · Widget · Zalo · Facebook · Viber · TikTok · Telegram. |
| Sort | Newest / Oldest. |
| Manual reply | Staff step in to reply directly when a customer needs a human. |
| Claim / release | “Claim” a conversation to take it over, then “release” when done. |
| Export data | Export conversations to CSV/JSON (when the feature is enabled). |
Improve conversations (retrain from real chats)
This is one of AI360's most powerful features: turn every real conversation into a lesson for the bot. When the bot answers poorly, you review and “teach” it again right on that conversation, the bot answers better next time.
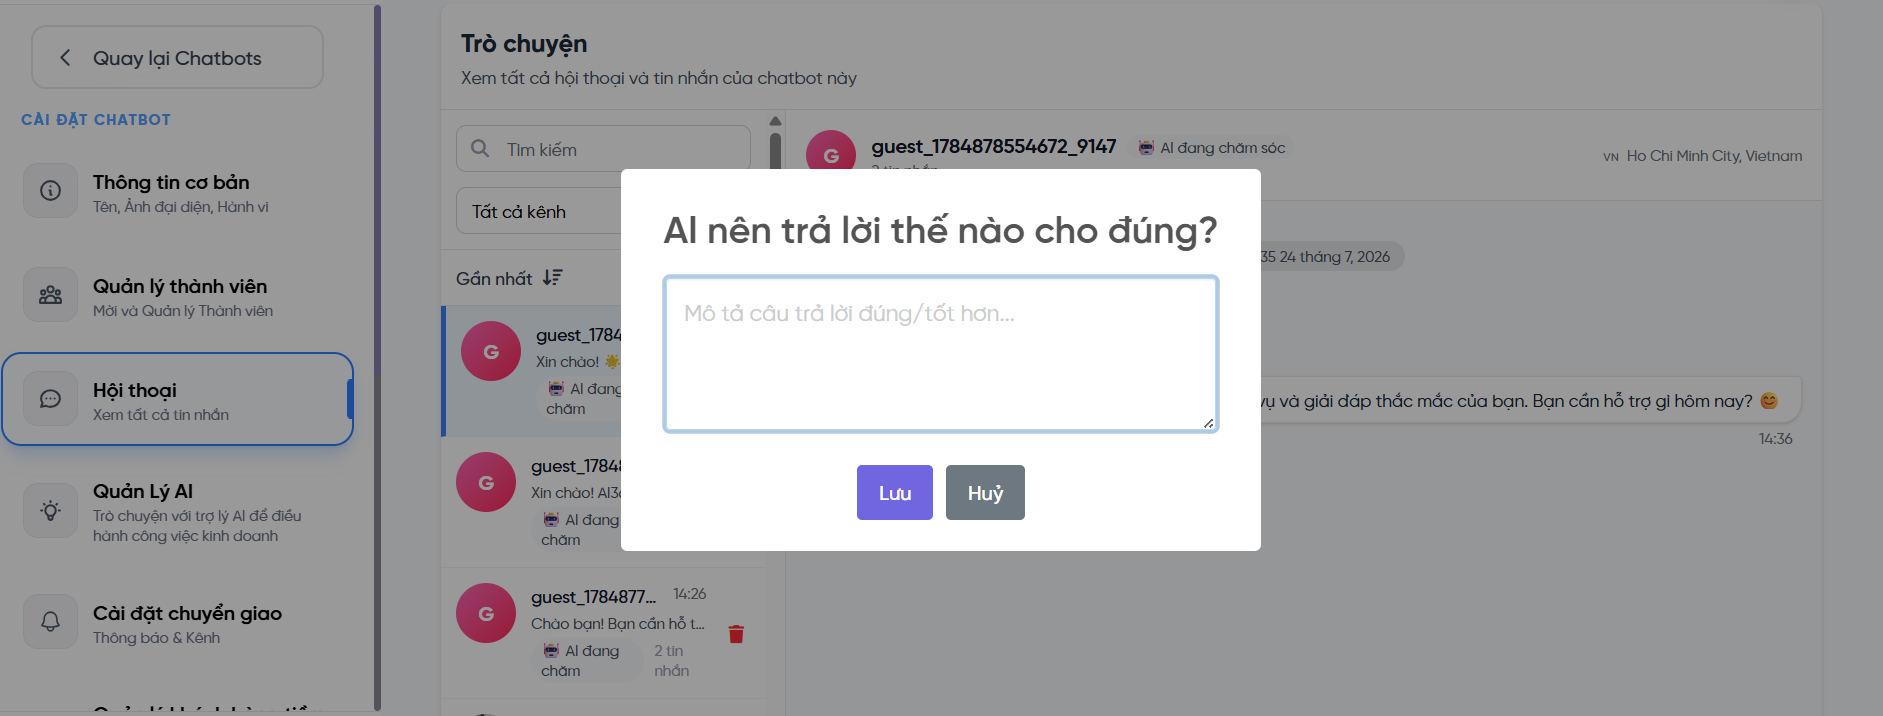
Enter the correct/better answer for a poor AI reply.
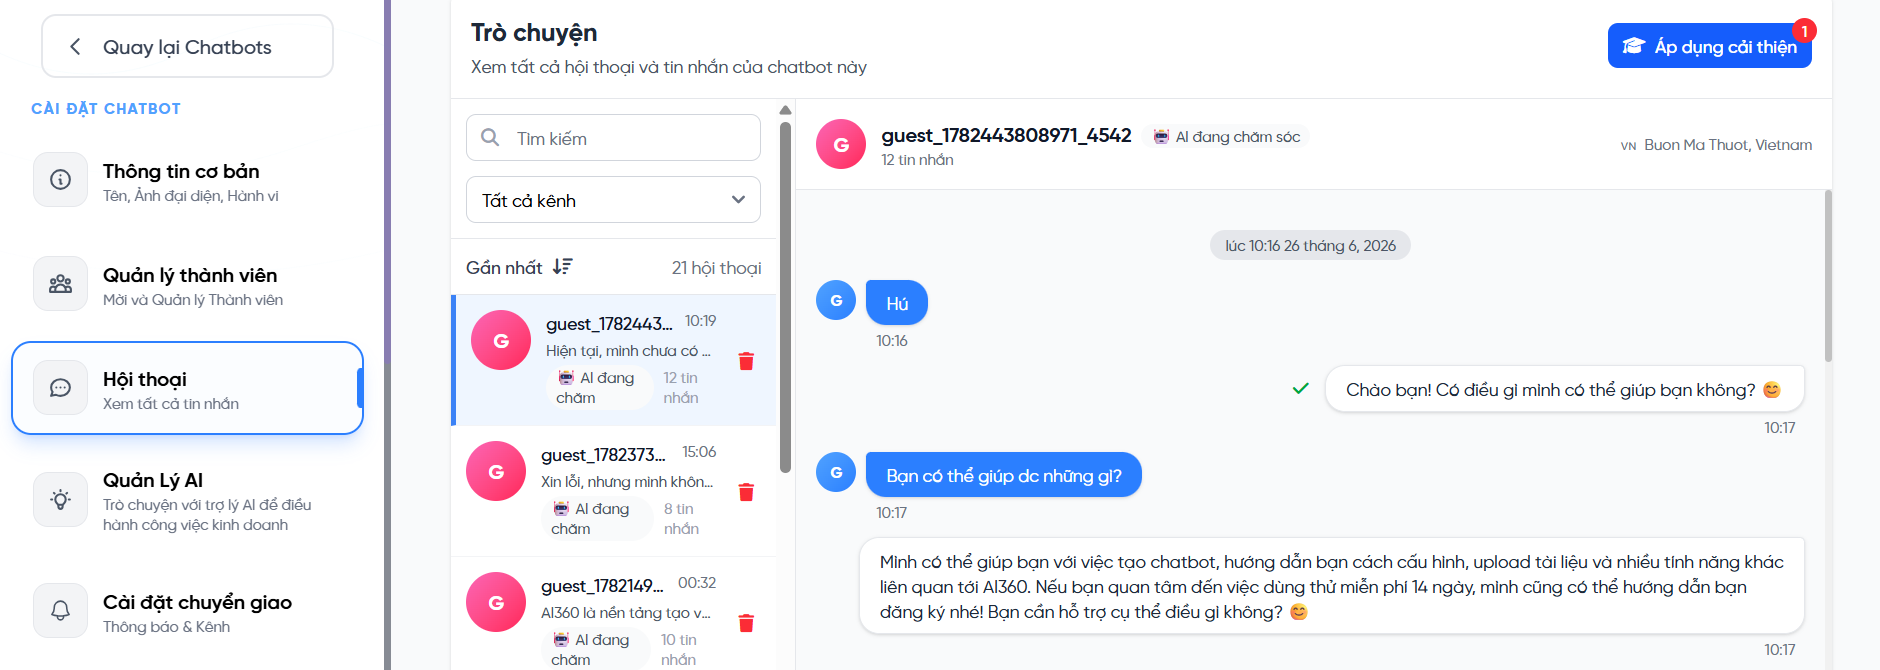
The “Apply improvements” button (with a suggestion-count badge) to retrain the bot.
📝 How it works
In a conversation, you flag a weak AI answer and write a better one. Suggestions are collected by count.
🎓 Apply
Click “Apply improvements” (with a suggestion-count badge) to retrain the bot with your saved edits.
⭐ Strengths
The bot improves continuously from your real situations, instead of rewriting all the docs.
💡 Why you need it
No conversation is perfect from the start. This “review → fix → re-teach” loop keeps raising answer quality.
Steps
- Open Conversations, pick a real conversation.
- Flag the weak answer and enter the desired answer.
- Click “Apply improvements” at the top of Conversations to retrain.
- Make sure the “Improve answers” toggle is on in basic configuration so the bot uses these improvements.
AI Manager, ask about your business
Beyond answering customers, AI360 also has an assistant for the owner: chat to ask how things are going and get “to-dos”, like a manager who always knows the numbers.
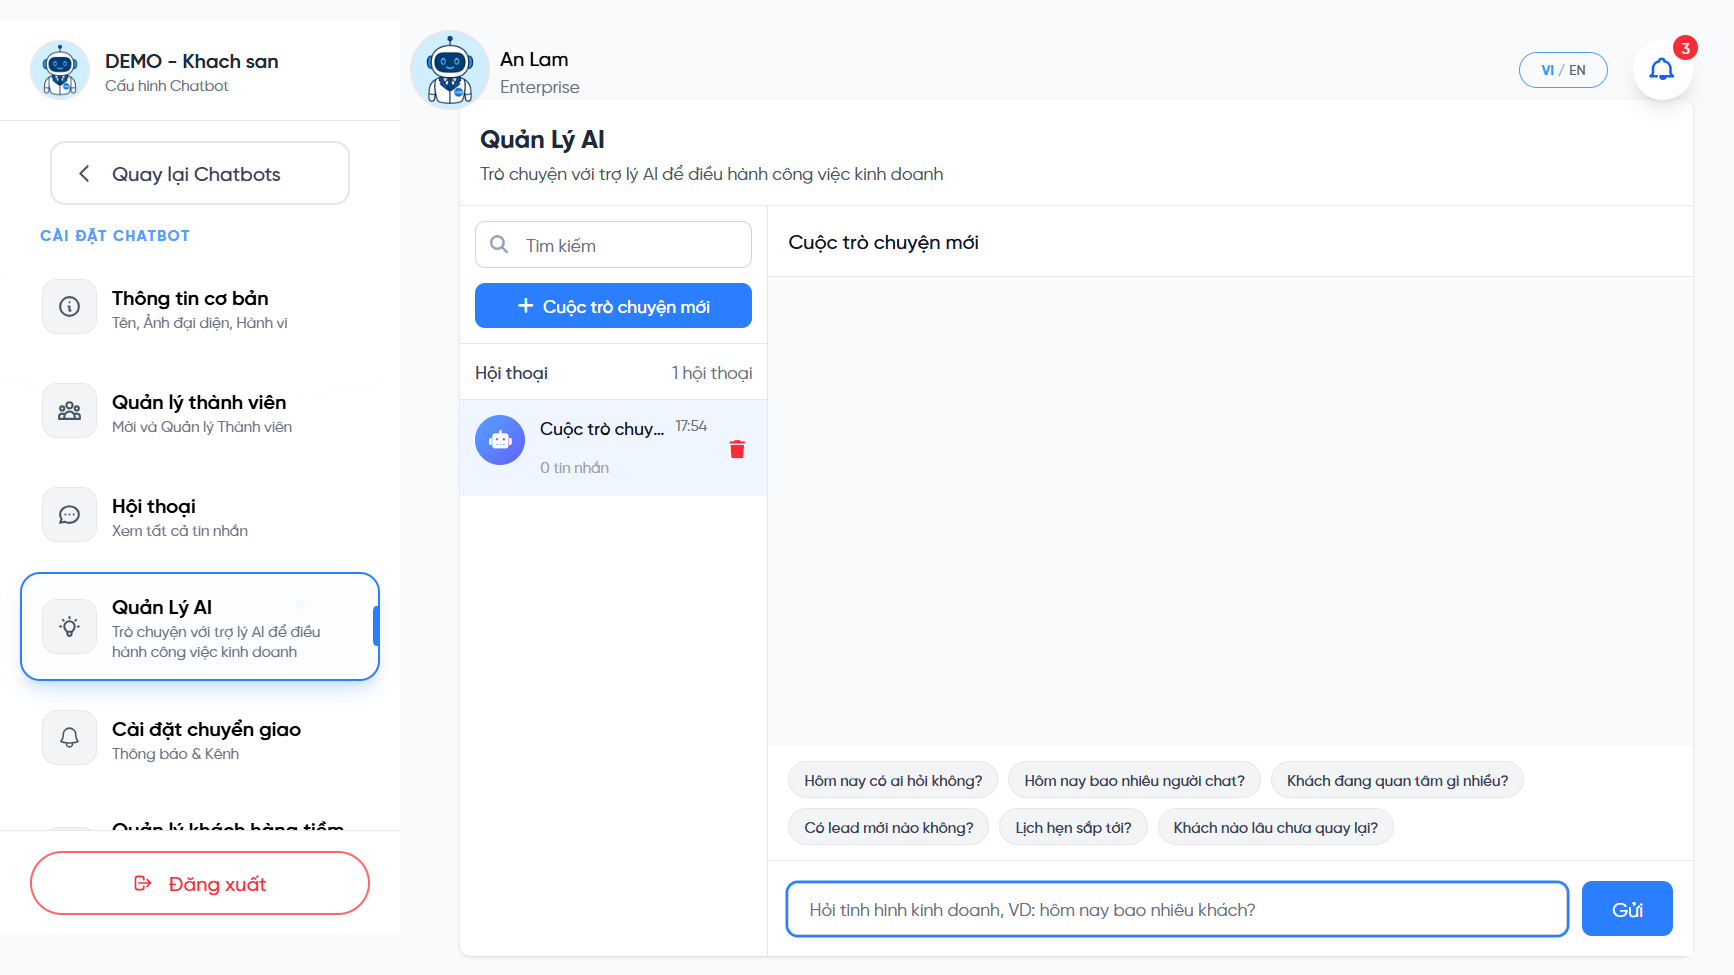
Built-in suggested questions.
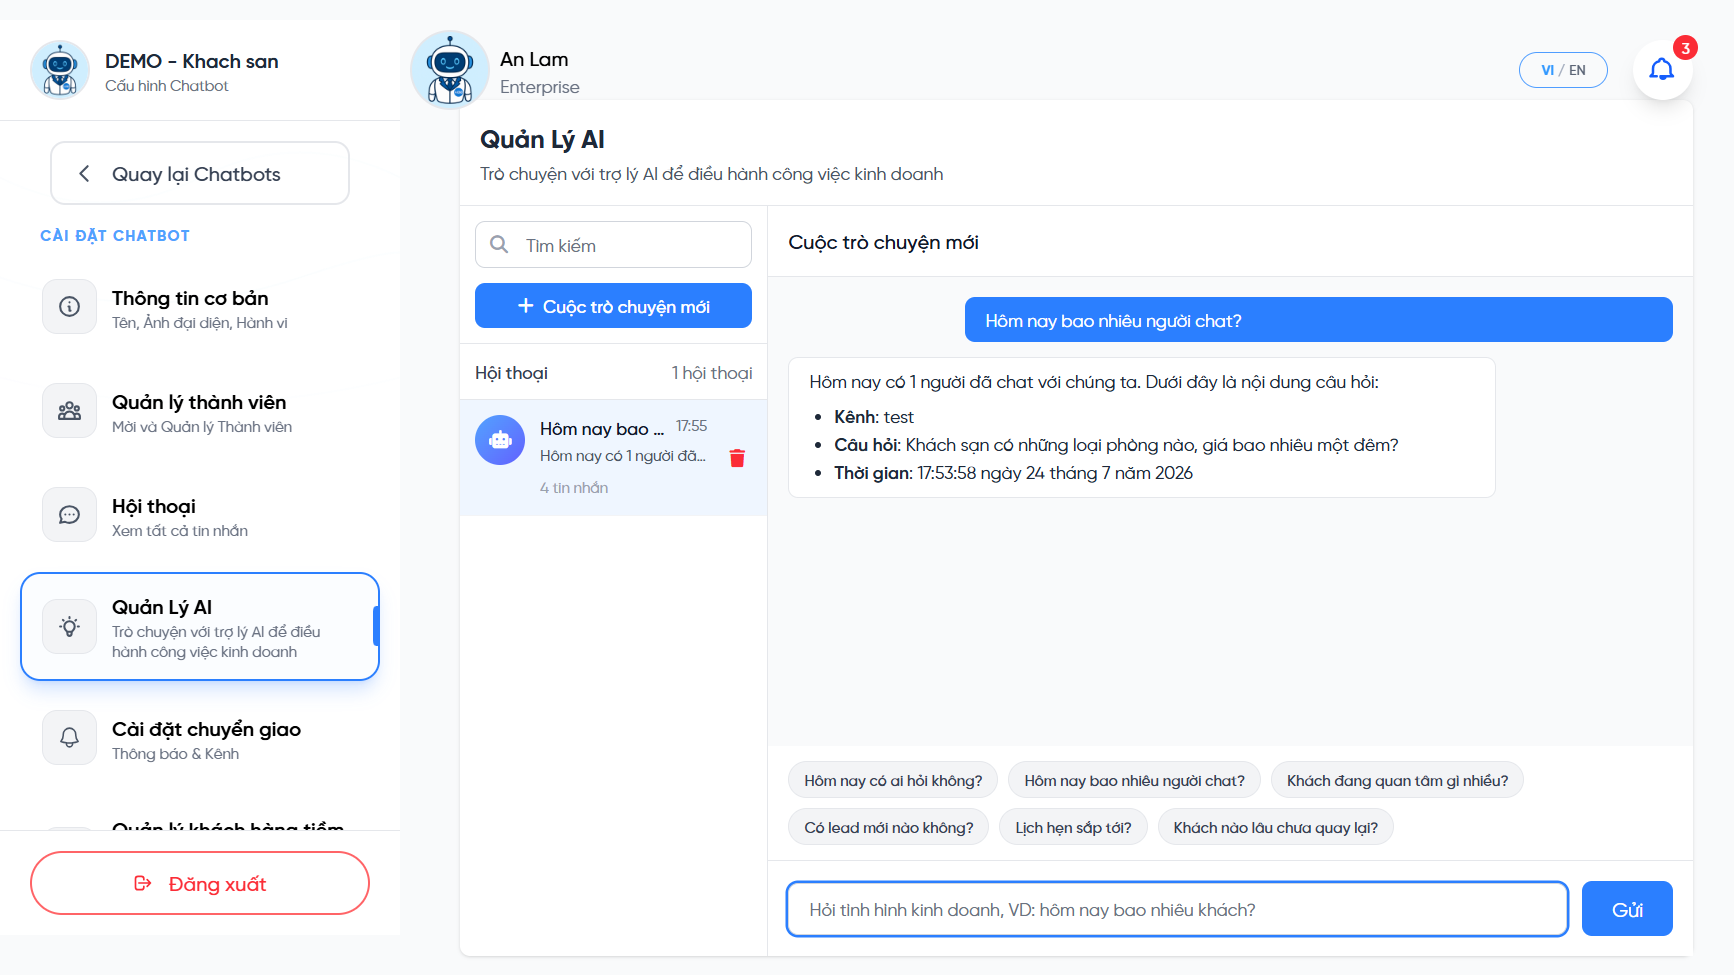
The assistant answers from real data.
Example questions
⭐ Strengths
Ask in natural language, answered from your real conversation & customer data.
💡 Why you need it
Owners are busy and can't read every inbox. The assistant summarizes fast and suggests to-dos, especially to retain existing customers.
Handoff settings
Decide when the bot alerts a human. When a customer intends to buy/book or wants to talk to staff, the system sends a notification so you can respond in time.
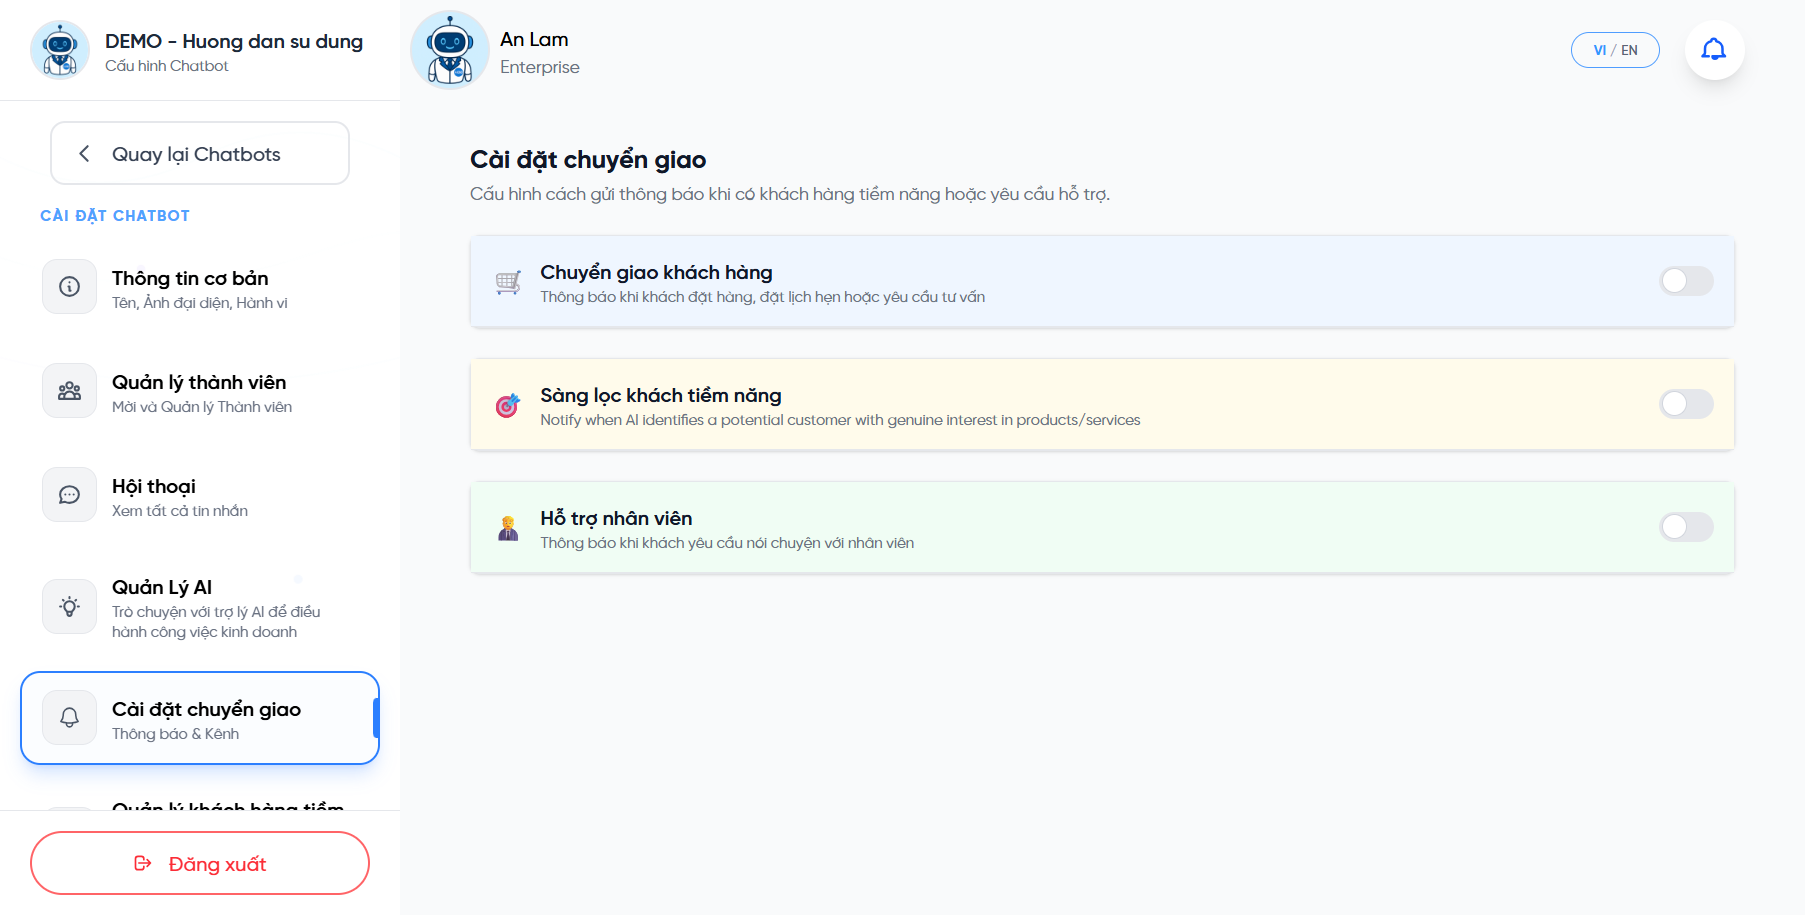
Three handoff types you can toggle independently.
Meaning of each type
| Type | Triggers when… |
|---|---|
| 🛒 Customer handoff | A customer places an order, books an appointment, or requests advice. |
| 🎯 Lead qualification | AI recognizes a customer with genuine intent/need for products, services. |
| 🧑💼 Staff support | A customer asks to talk to a real person. |
Leads & Appointments
Every customer with intent (purchase, booking, consultation) is auto-captured as a lead and gathered in one place to track and nurture.
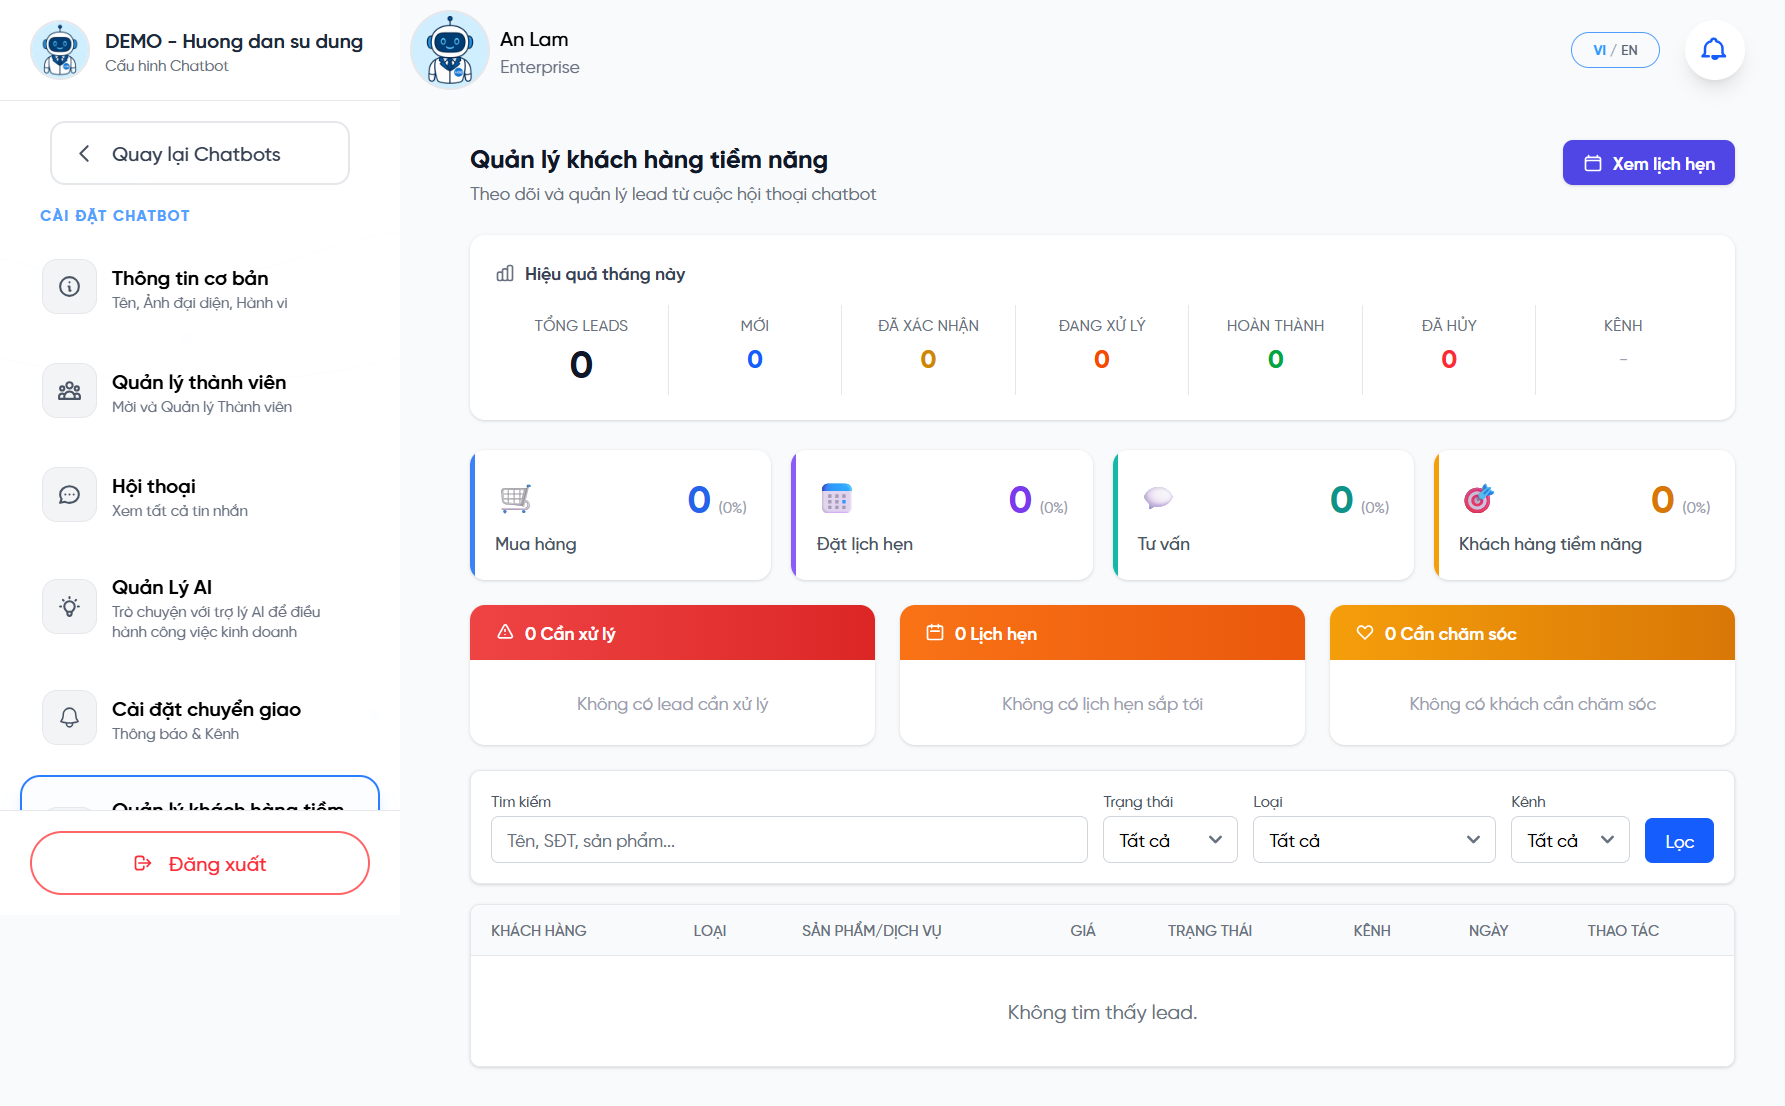
Lead overview by month.
The components on screen
| Component | Meaning |
|---|---|
| This month performance | Total leads & split by status: New · Confirmed · In progress · Completed · Cancelled. |
| Lead types | 🛒 Purchase · 📅 Appointment · 💬 Consultation · 🎯 Qualified lead (with % share). |
| To handle / Appointments / To nurture | Three priority groups so no customer slips through. |
| Filters | Filter by Status, Type, Channel (Zalo/Messenger/Telegram/Widget) and search by name/phone/product. |
| Lead table | Customer · Type · Product/Service · Price · Status · Channel · Date · Actions. |
| View appointments | Open the appointments calendar to track upcoming bookings. |
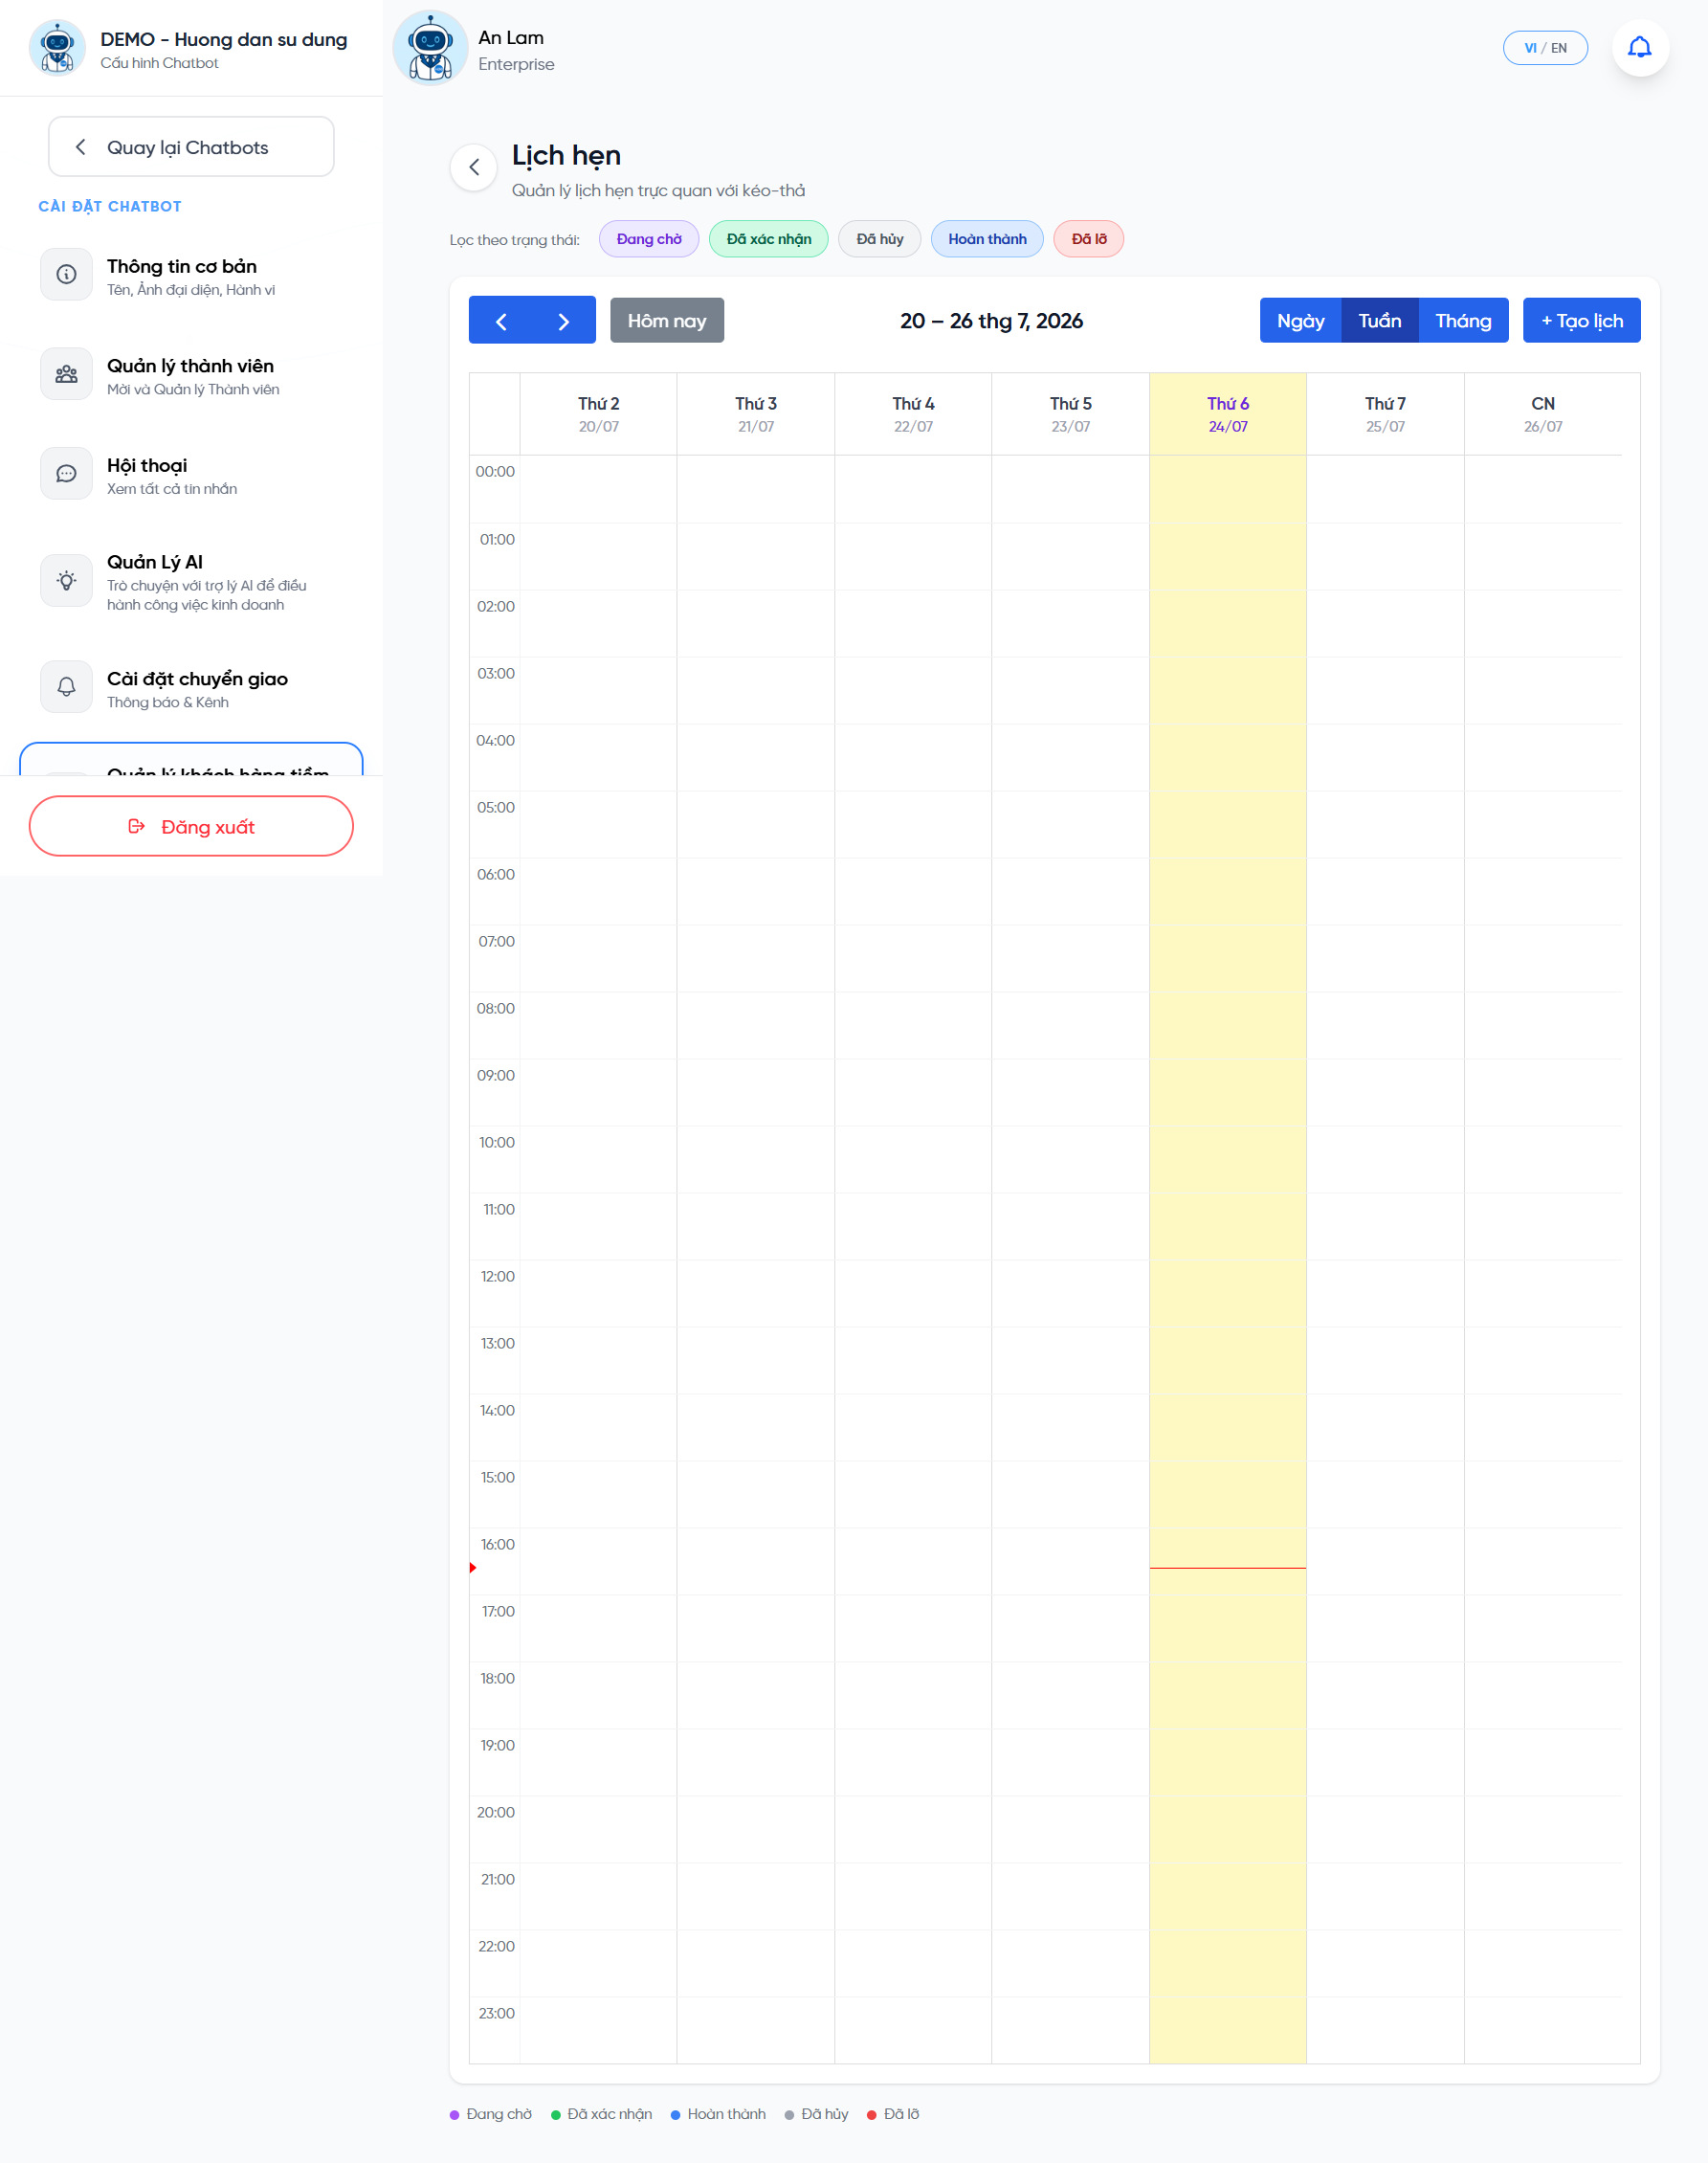
Appointments in calendar view.
⭐ Strengths
AI auto-extracts leads & appointments from conversations, no manual copying of each customer.
💡 Why you need it
Gathering all leads in one place helps you follow the sales funnel and reminders, raising close rates.
Campaigns / Scenarios management
A scenario is a “guiding flow” that helps the bot lead customers toward a business goal naturally, e.g. from a chit-chat → suggest a fitting service → invite to book.
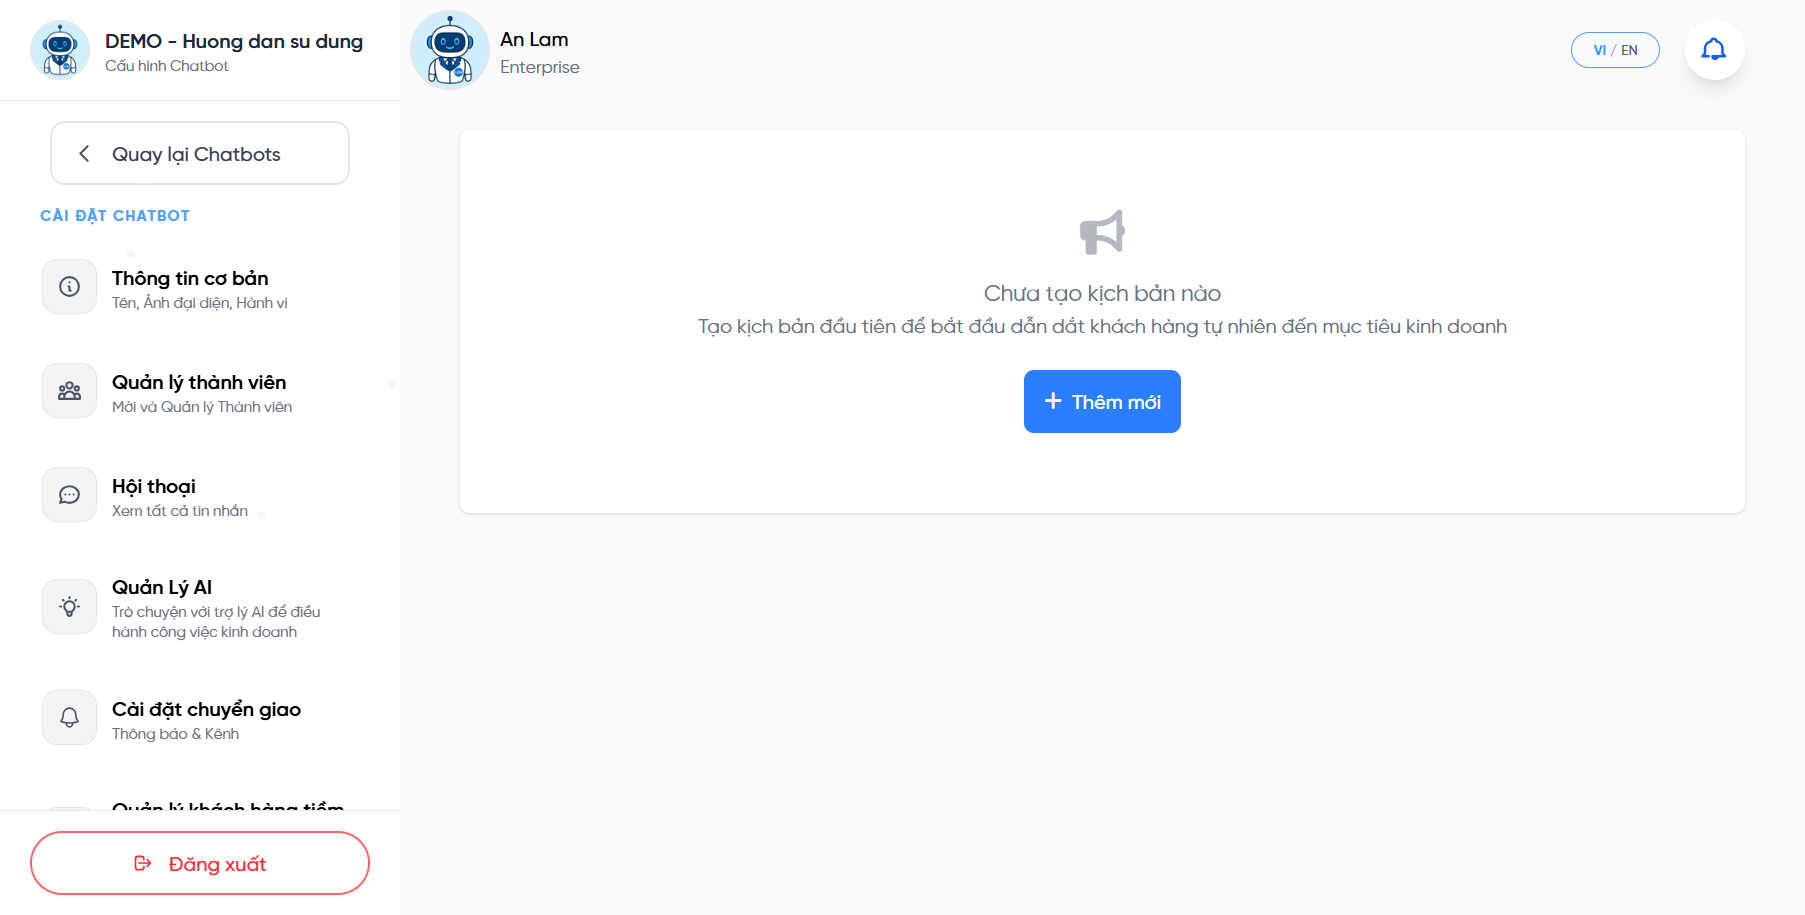
Scenario list.
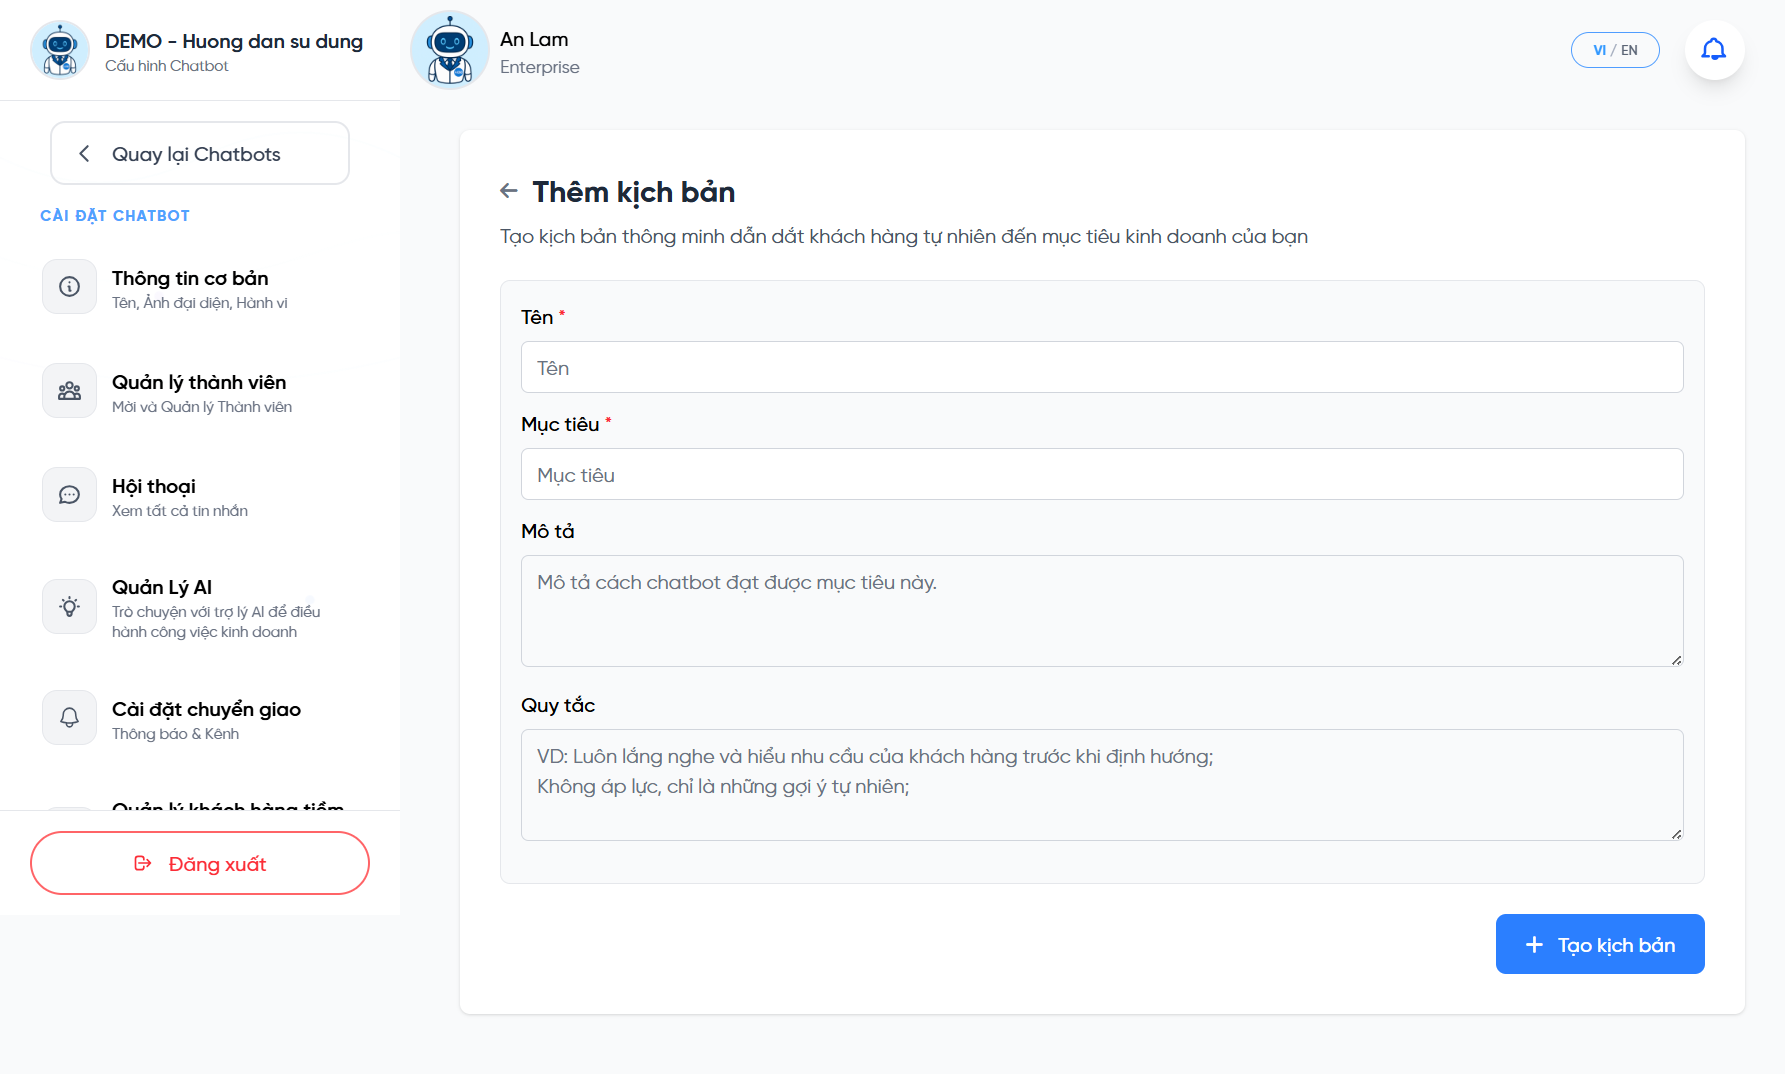
New scenario form.
Fields when creating a scenario
| Field | Meaning |
|---|---|
| Name required | A recognizable scenario name, e.g. “Deluxe room consult, summer promo”. |
| Goal required | The desired outcome, e.g. “guest books a room direct with the hotel”. |
| Description | Describe how the bot achieves this goal. |
| Rules | Behavior constraints, e.g. “always listen to needs first”, “no pressure, only natural suggestions”. |
⭐ Strengths
The bot proactively steers the conversation toward the goal, not just answering passively.
💡 Why you need it
Helps turn “just asking” into “booking”, lifting conversion subtly.
Steps
- Open Campaigns management → “+ Add new”.
- Enter Name, Goal, Description and Rules.
- Click “Create scenario”. The bot will apply it to guide conversations.
Team members
Invite staff to co-manage the chatbot with the right permissions, chat handlers, editors, or report viewers.
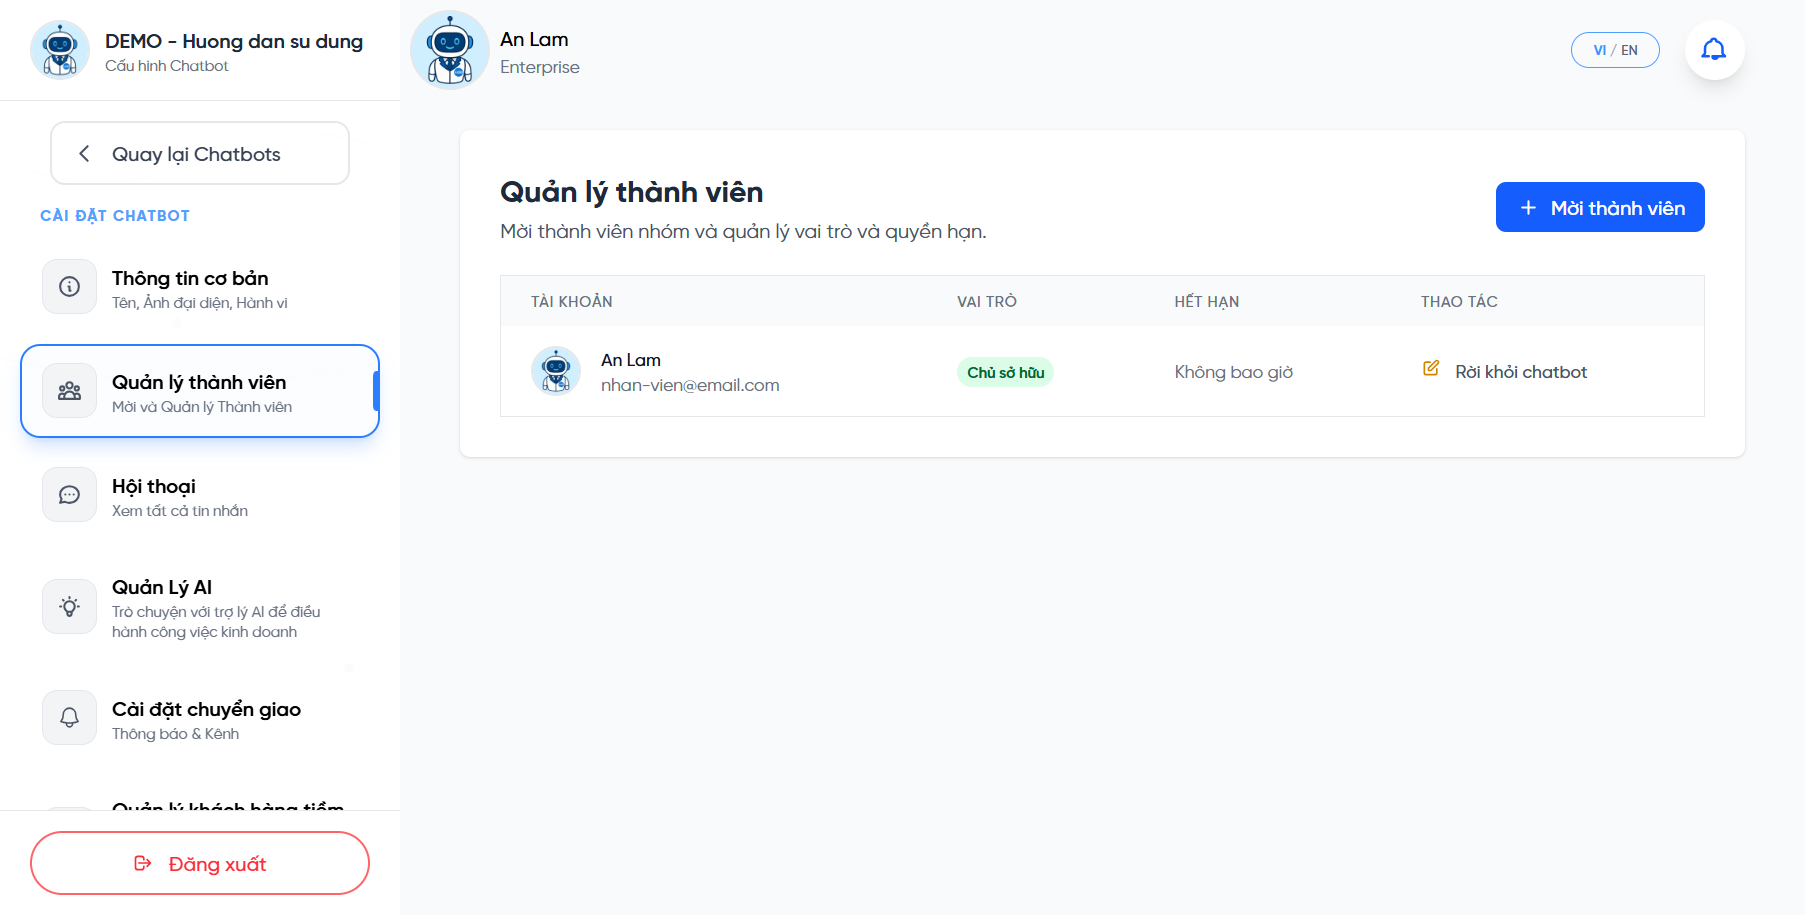
Member list & roles.
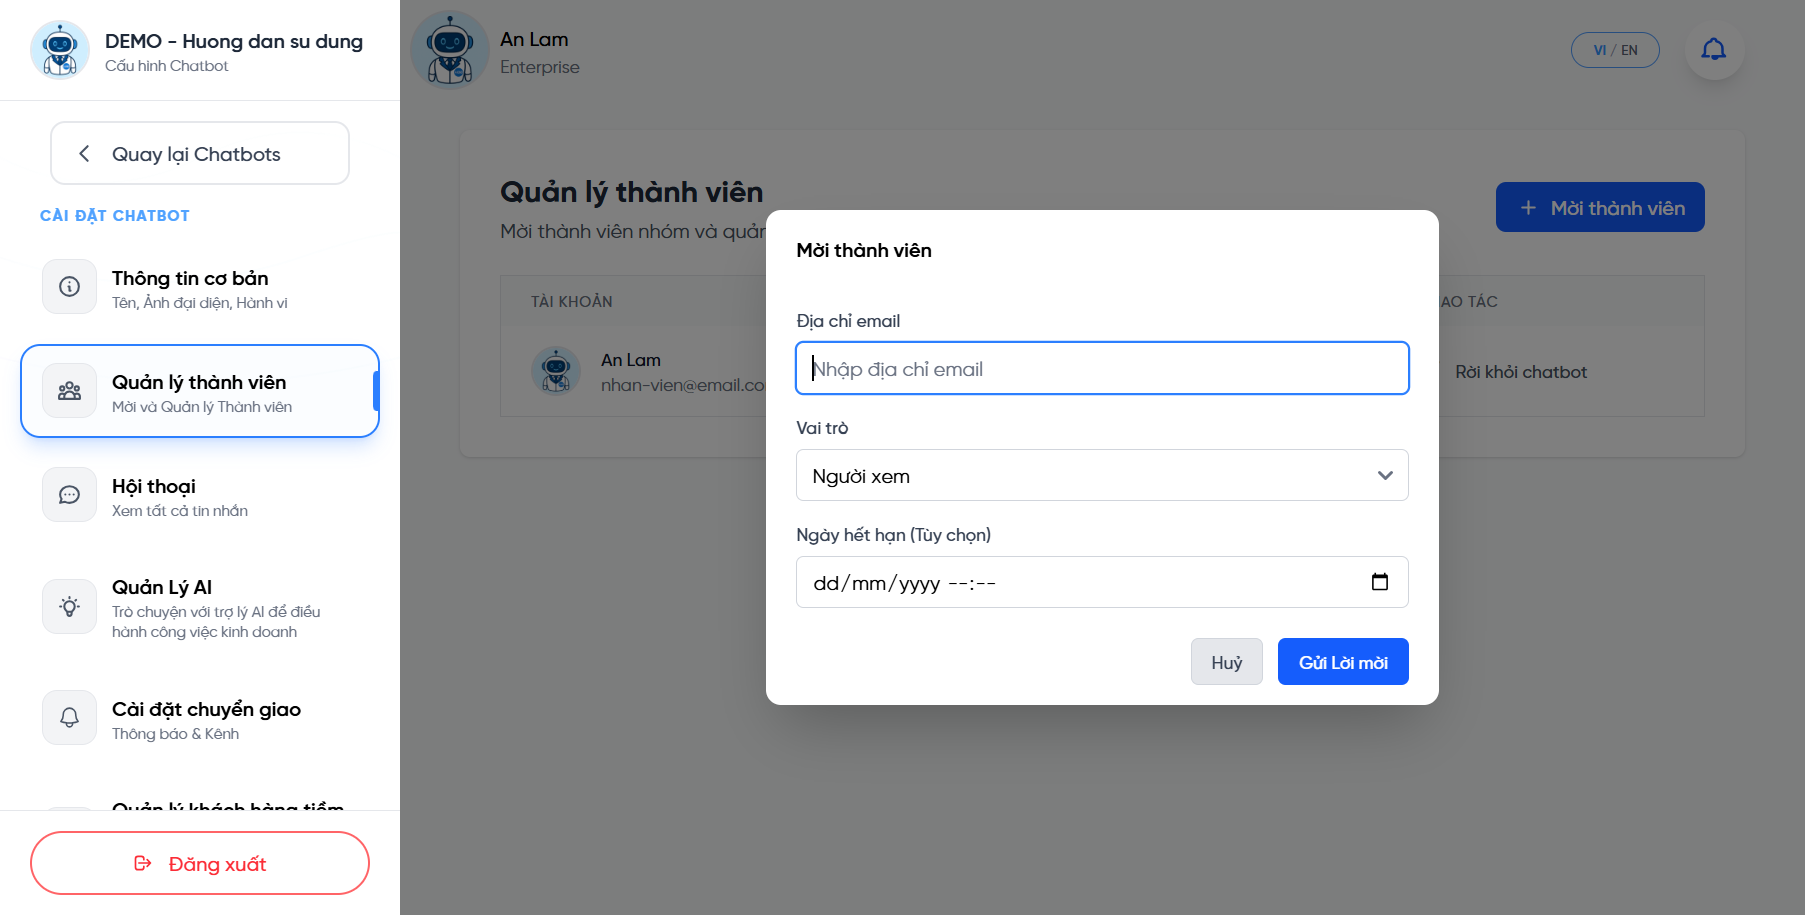
Invite a member by email.
Three roles
| Role | Permissions |
|---|---|
| Owner | Full rights: configuration, delete bot, manage members & billing. |
| Editor | Edit configuration, train, reply to conversations, but limited admin rights. |
| Viewer | View only (conversations, reports), no editing. |
Invite steps
- Open Team members → “+ Invite member”.
- Enter the email, choose a role and (optionally) an expiry date for access.
- Click “Send invite”. You can change the role or remove a member anytime.
Plans & Billing
Pick a plan by your scale. The plan determines message quota, number of chatbots, channels, members, data storage and history retention.
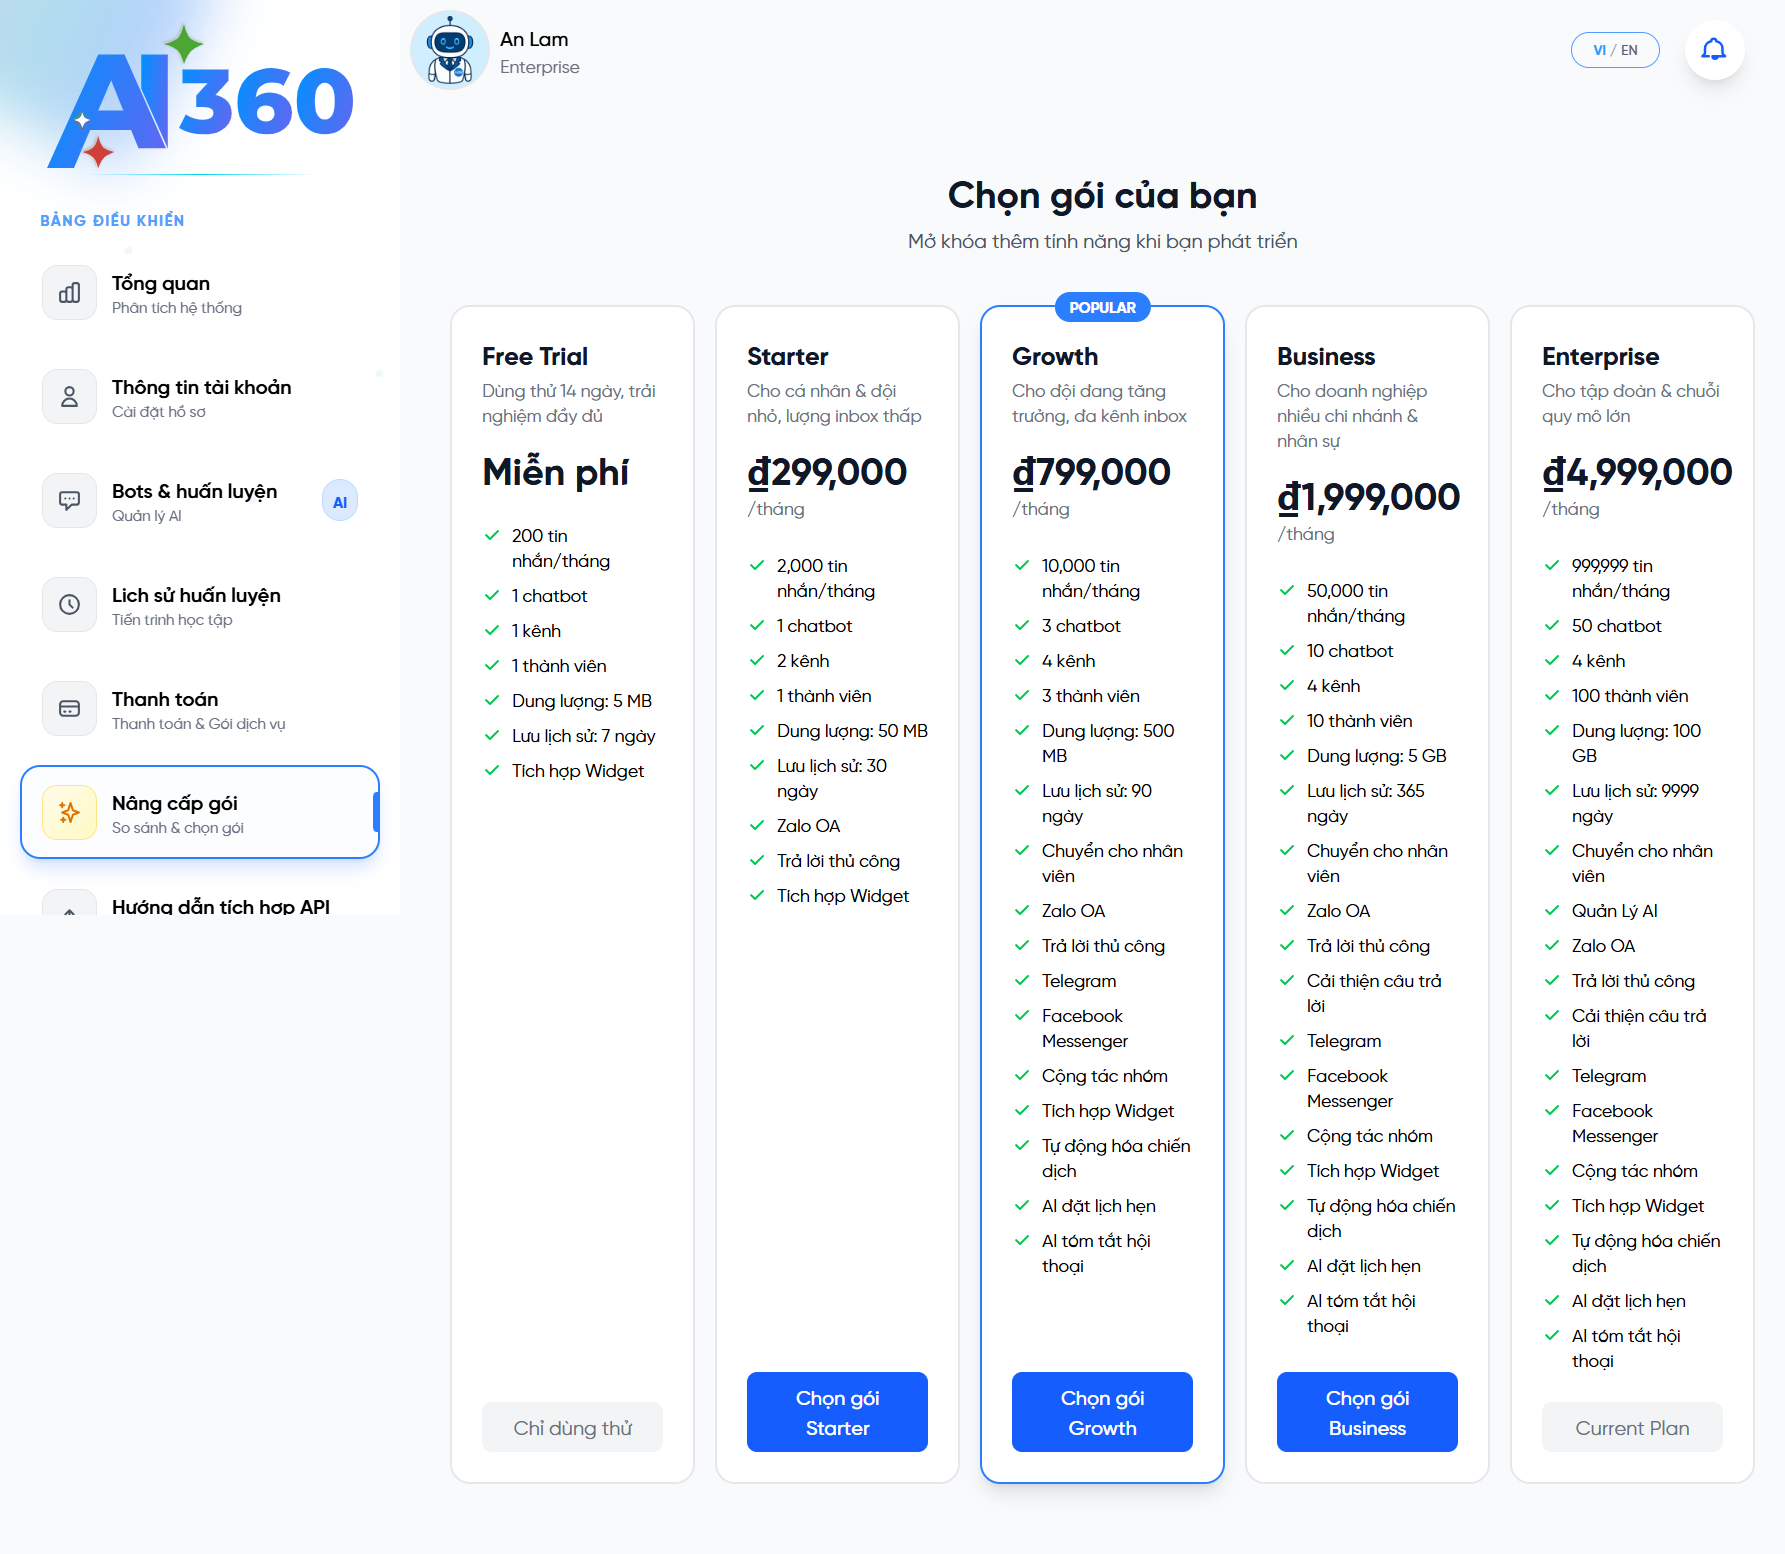
Plans: Free Trial · Starter · Growth · Business · Enterprise.
What the quotas mean
| Quota | Meaning |
|---|---|
| Messages/month | The number of bot replies counted per month. |
| Number of chatbots | How many bots you can create (each branch/service can have its own). |
| Number of channels | How many messaging channels you can connect. |
| Number of members | How many staff co-manage. |
| Storage | Total training-file storage kept. |
| History retention | How many days conversations are kept. |
| Advanced features | E.g. manual reply, Zalo OA, staff handoff, AI Manager, answer improvement... depending on plan. |
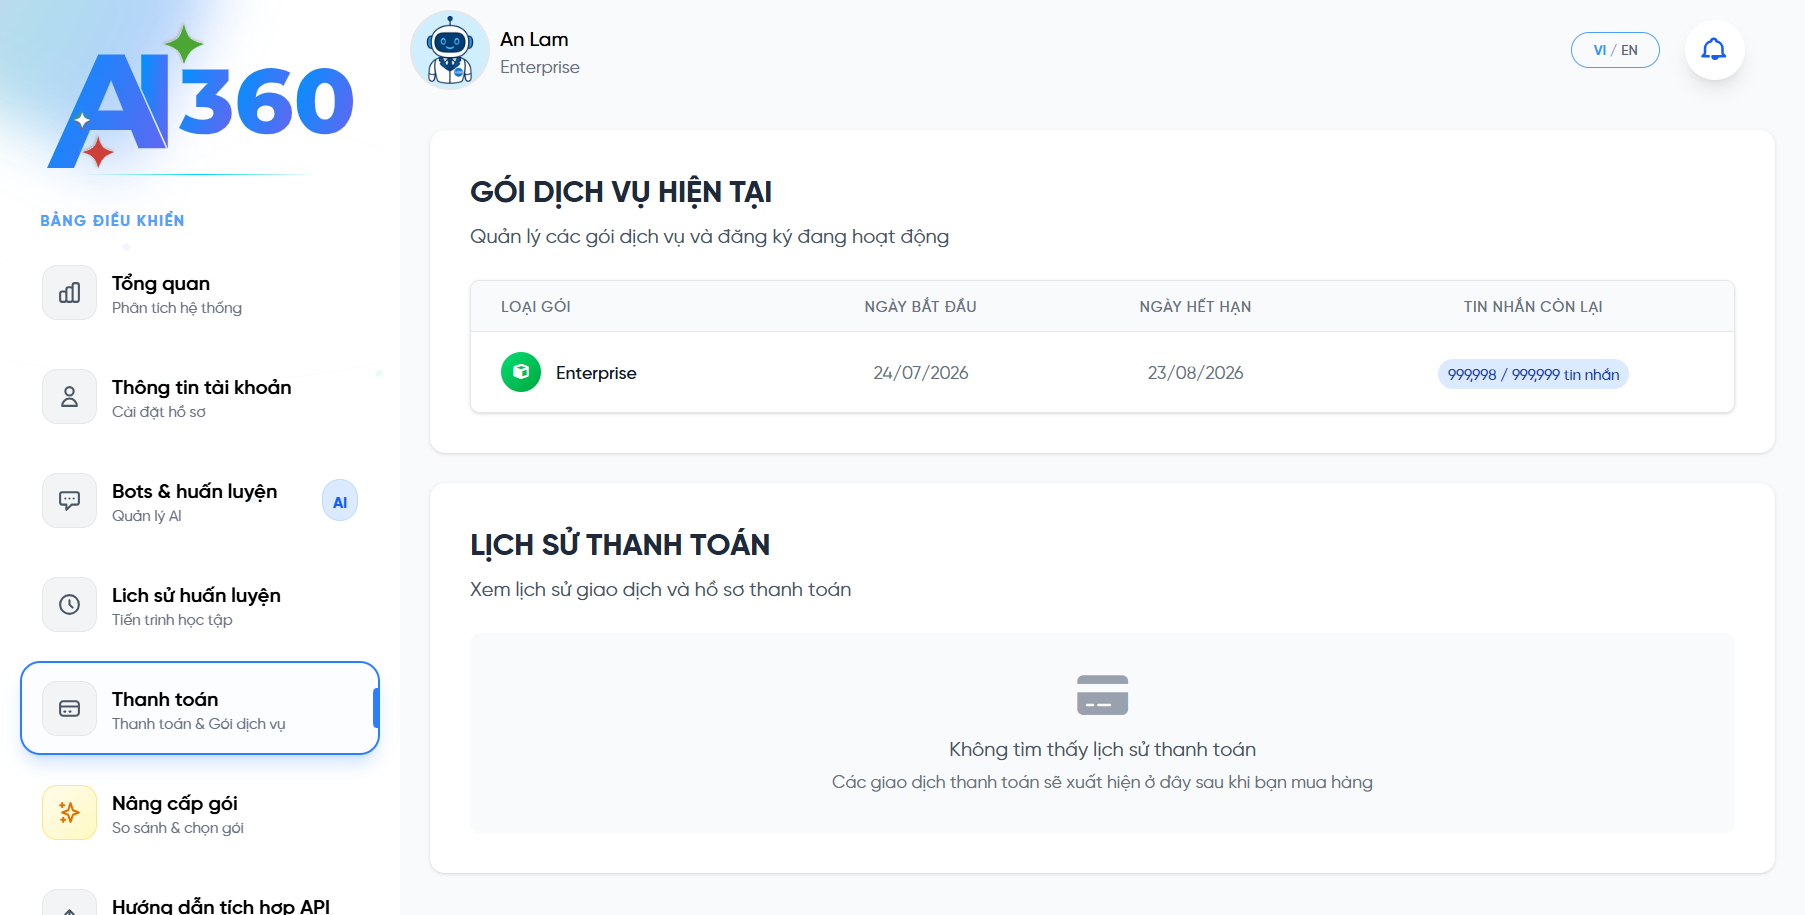
The Billing & Invoices page.
Upgrade steps
- Go to Upgrade plan, compare and pick the right plan.
- Pay via Stripe (international cards) or PayPal.
- View invoices & transaction history under Billing; track monthly usage.